


4x4x4 LED-cube based Arduino and Flower protoboard

I'll show you how to make the cube on the Flower protoboard, and finally how to make it shine. You will see the point-to-point wiring is very clear.
Let's take a look at the display firstly.
Step 1 you will need:

TOOLS
- soldering iron
- pliers
- small screwdriver
- tweezer
- solder
- Empty plastic bottles or anything you can drill some holes and fix led
- pencil
- ruler
- computer with Arduino software
- USB-cable
- snips
PARTS
- 64 pcs led's
- 16 pcs 1k resistors(0603) that go with the LED's
- Freaduino MEGA2560 or Arduino MEGA2560
- ElecFreaks Flower V2.2 protoboard
SOFTWARE
- DEMO 1 FV8XM2MGGPEXFII.zip (The video display)
- DEMO 2 FWSTA8ZGSUT1S5W.zip
Note: the demo code LEDPin and LayerPin need change your Arduino IO. Here we define as below:
[cce_cpp]
// Initalize our LED columns (positive)
int LEDPin[] = {6,5,24,26,28,30,32,34,36,38,40,42,44,46,48,50};
// Initalize the LED layers (ground)
int LayerPin[] = {10,11,12,13};
[/cce_cpp]
Step 2 Drill the fixed holes

Draw on the bottle a grid with the lines 10.16 mm apart. (Because you will fix the led onto protoboard at the end, so you must fit for the protoboard holes distance.
Our Flower protoboard hole distance is 2.54mm, 4x2.54mm=10.16mm ) Draw 4 lines horizontally and 4 lines vertically. Then use tweezer or other sharp tools drill holes.
Step 3 Bending the legs of the led

As the picture shown, the longer pin is the cathode. Bending the legs accord with the arrow.
Step 4 Placeing the LED and solder them

Each cathode of LED is soldered together. Make sure that you don't solder an anode to an cathode.
Step5 Soldering the 4 layer LED


This step is a little difficult. You'd better place the LED as the direction shown on the picture then solder each layer together(solder the anode of different layer together. We call it column. Each column need a IO to control.). In this way, you will easy to solder the column in the middle.
Step6 Fixing the LED cube onto the Flower protoboard.
 [caption

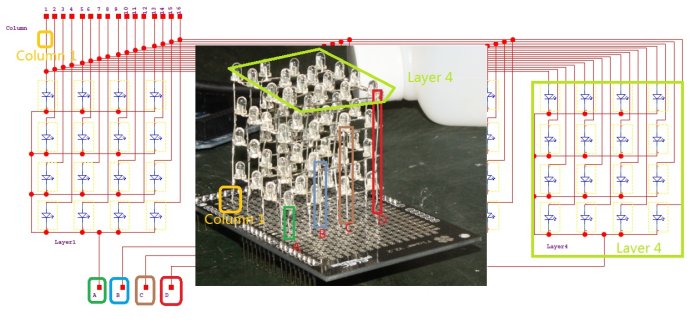
Each anode is a column. A B C D is the cathode of each layer. So we need 16+4=20 IOs to control the 4X4X4 LED cube.
Step7 Wiring on Flower protoboard.


You can easy to wire on our Flower protoboard. Red square in the picture is 1k 0603 resistors.
Step 8 Starting play

Now you have completed the entire process. Next you need to put it into the freaduino, and download the code.Before you start to paly it. We should briefly explain how does the LED cube work. The schematic of LED cube is very simple.

The LED cube 4x4x4 has a total of 16 transistors are used to switch on the Led columns and then another total of 4 lines to switch on or off the ground layer. So a total of 16+4 = 20 lines are needed to make the LED cube 4x4x4 work. It is important that the 4 ground layers are switched bwteen them to stwich one layer at a time and the swicthe the desired led's on the partucular layer. I believe you already have enough understanding of 4X4X4 LED cube. Now please enjoy it.
About the Author


How to Send Micro:bit Data to ThingSpeak IoT Platform
January 11, 2018

VC0706 Camera Module DIY Guide
December 18, 2014

nRF24L01 Module Demo for Arduino
May 6, 2011


Children’s Programming Education is the Future Trend
March 20, 2024


ELECFREAKS AI Smart Lens Now Compatible with Gigo Building Blocks!
February 21, 2024


Comments