


Android BLE User Guide

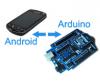
If you are an electronics enthusiast, and also fond of programming, I would be very glad to share with you an Android BLE application development method, so you can integrate the phone and MCU to do some more interesting things. Right now we begin to explain how to develop an Android BLE application, and you can also refer to the official Google tutorial . This guide is a packed tutorial, which enables you to build your Android BLE application more easily and more quickly. Of course, I'll upload my source code for everyone to share it and you can also refer to the official sample sdk/samples/android-18/legacy/BluetoothLeGatt.
1. Create a new Android project
Open Eclipse,File->New->Android Application Project,and then fill the Application name in the Application Name edit box, for example, BleExample,or others. Minimum Required SDK selects API18:Android 4.3,and Target SDK also selects API18:Android 4.3,as buletooth 4.0 must be with Android 4.3edition or above. Others default unchanged and please continue clicking the Next button until Finish button appears,and then click the Finish button.
2. Add the permissions and services
Add the below code in the manifest file
[ccen_xml]


[/ccen_xml]
3. Create the ListView item layout file
Aiming to display each content of ListView, here we use customization(defining by yourself), so that each ListView can show more content,item_list.xml is demonstrated as below
[ccen_xml]


[/ccen_xml]
Copy the source code of BleExample /com.elecfreaks.ble to your project src directory,and then open the file with error prompt,
pressing the shift+ctrl+O keys.
4. Modify activity_main.xml, increasing scanButton and bleDeviceListView
Increased contents are shown as below
[ccen_xml]
5. In MainActivity.java, add scanButton mothod of responding to events
[ccen_xml]
(onClick="scanOnClick")
      public void scanOnClick(final View v){
}
[/ccen_xml]
6. Add member for MainActivity
[ccen_java]
	private Button scanButton;
	private ListView bleDeviceListView;
	private BLEDeviceListAdapter listViewAdapter;

	private BluetoothHandler bluetoothHandler;
	private boolean isConnected;
[/ccen_java]
-
7. Set member value in MainActivity.onCreate
[ccen_java]
	scanButton = (Button)findViewById(R.id.scanButton);
	bleDeviceListView = (ListView)findViewById(R.id.bleDeviceListView);
	listViewAdapter = new BLEDeviceListAdapter(this);

	bluetoothHandler = new BluetoothHandler(this);
        bluetoothHandler.setOnConnectedListener(new OnConnectedListener() {

		@Override
		public void onConnected(boolean isConnected) {
			// TODO Auto-generated method stub
			setConnectStatus(isConnected);
		}
	});
	bluetoothHandler.setOnRecievedDataListener(new 	OnRecievedDataListener() {

		@Override
		public void onRecievedData(byte[] bytes) {
			// TODO Auto-generated method stub
			System.out.printf("REC:");
			for(byte b:bytes)
				System.out.printf("%02X ", b);
			System.out.printf("\n");
		}
	});
[/ccen_java]
8. Adding setConnectStatus mothod
[ccen_java]
public void setConnectStatus(boolean isConnected){
	this.isConnected = isConnected;
	if(isConnected){
		showMessage("Connection successful");
		scanButton.setText("break");
	}else{
		bluetoothHandler.onPause();
    		bluetoothHandler.onDestroy();
    		scanButton.setText("scan");
	}
}
private void showMessage(String str){
	Toast.makeText(MainActivity.this, str, Toast.LENGTH_SHORT).show();
}
[/ccen_java]
9. Adding content in scanOnClick
[ccen_java]
if(!isConnected){
	bleDeviceListView.setAdapter(bluetoothHandler.getDeviceListAdapter());
	bleDeviceListView.setOnItemClickListener(new OnItemClickListener() {

	@Override
	public void onItemClick(AdapterView parent, View view, int position, long id) {
		String buttonText = (String) ((Button)v).getText();
		if(buttonText.equals("scanning")){
			showMessage("scanning...");
			return ;
		}
		BluetoothDevice device = bluetoothHandler.getDeviceListAdapter().getItem(position).device;
			// connect
			bluetoothHandler.connect(device.getAddress());
		}
	});
	bluetoothHandler.setOnScanListener(new OnScanListener() {
		@Override
		public void onScanFinished() {
			// TODO Auto-generated method stub
			((Button)v).setText("scan");
			((Button)v).setEnabled(true);
		}
		@Override
		public void onScan(BluetoothDevice device, int rssi, byte[] scanRecord) {}
	});
	((Button)v).setText("scanning");
	((Button)v).setEnabled(false);
	bluetoothHandler.scanLeDevice(true);
}else{
	setConnectStatus(false);
}
[/ccen_java]
10. Send data
[ccen_java]
byte[] data = new byte[1];
data[0] = 0x02;
bluetoothHandler.sendData(data);
[/ccen_java]
11. Receive data
Upon receiving data, the mothod of OnRecievedDataListener.onRecievedData(byte[] bytes) set from bluetoothHandler.setOnRecievedDataListener()OnRecievedDataListener.onRecievedData(byte[] bytes) would be used,and bytes means received data
12. Send data to MCU via protocol.(Use BLUNO from ElecFreaks)
In src directory, create Transmitter.java, adding the constructed function with two parameters as below
[ccen_java]
public Transmitter(Context context, BluetoothHandler bluetoothHandler){
	this.context = context;
	this.mBluetoothHandler = bluetoothHandler;
}

private void sendData(byte[] bytes){
	mBluetoothHandler.sendData(bytes);
}
[/ccen_java]
13. Receive MCU data via protocol.
MCU data receiving and sending protocol uses JSON packet,and the format is {“T”:your value, “V”:your value, ...}. Of course you can define other values. Create the MyArray.java in src directory,aiming to connecting two arrays. The code was shown as below
[ccen_java]
public class MyArray {

	static public byte[] arrayCat(byte[] buf1,byte[] buf2){
	    byte[] bufret=null;
	    int len1 = 0;
	    int len2 = 0;
	    if(buf1 != null)
	    	len1 = buf1.length;
	    if(buf2 != null)
	    	len2 = buf2.length;
	    if(len1+len2 > 0)
	    	bufret = new byte[len1+len2];
	    if(len1 > 0)
	    	System.arraycopy(buf1, 0, bufret, 0, len1);
	    if(len2 > 0)
	    	System.arraycopy(buf2, 0, bufret, len1, len2);
	    return bufret;
    }
}
[/ccen_java]
Copy the protocol.java in my sample code to src directory Adding member
[ccen_java]private Protocol protocol;[/ccen_java]
From onCreate(),delete:
[ccen_java]bluetoothHandler.setOnRecievedDataListener();[/ccen_java]
Adding
[ccen_java]
protocol = new Protocol(this, new Transmitter(this, bluetoothHandler));
protocol.setOnReceivedDataListener(recListener);
[/ccen_java]
Adding member in MainActivity
[ccen_java]
private static final boolean INPUT = false;
private static final boolean OUTPUT = true;
private static final boolean LOW = false;
private static final boolean HIGH = true;
private boolean digitalVal[];
private int analogVal[];
[/ccen_java]
Initializing in onCreate
[ccen_java]
digitalVal = new boolean[14];
analogVal = new int[14];
[/ccen_java]
Adding a member:
[ccen_java]
private OnReceivedRightDataListener recListener = new OnReceivedRightDataListener() {

	@Override
	public int onReceivedData(String str) {
		// TODO Auto-generated method stub
		try {
			JSONObject readJSONObject = new JSONObject(str);
			int type = readJSONObject.getInt("T");
			int value = readJSONObject.getInt("V");

			switch(type){
				case Protocol.ANALOG:{
					int pin = readJSONObject.getInt("P");
					analogVal[pin] = value;
				}break;
				case Protocol.DIGITAL:{
					int pin = readJSONObject.getInt("P");
					digitalVal[pin] = (value>0)?HIGH:LOW;
				}break;
				case Protocol.TEMPERATURE:{
					float temperature = ((float)value)/100;
				}break;
				case Protocol.HUMIDITY:{
					float humidity = ((float)value)/100;
				}break;
				default:break;
			}
		} catch (JSONException e) {
			// TODO Auto-generated catch block
			e.printStackTrace();
		}

		return 0;
	}
};
[/ccen_java]
14. Use protocol to send data
[ccen_java]protocol.writeAnalogData(9, 20); protocol.writeDigitalData(3, 1);[/ccen_java]
15. Use protocol to receive data
[ccen_java]protocol.readAnalogDataCommand(9); protocol.readDigitalDataCommand(3);[/ccen_java]
Note: Returned data is received by recListener
16. MCU port protocol(arduino)
Refer to the sample code of AndroidIOControl provided by me
17. If you need more information, please refer to our website
About the Author


How to Send Micro:bit Data to ThingSpeak IoT Platform
January 11, 2018

VC0706 Camera Module DIY Guide
December 18, 2014

nRF24L01 Module Demo for Arduino
May 6, 2011


Children’s Programming Education is the Future Trend
March 20, 2024

ELECFREAKS AI Smart Lens Now Compatible with Gigo Building Blocks!
February 21, 2024


Comments