


Master Your Micro:bit with Arduino IDE--Button and Other GPIO


In our previous blog Master Your Micro:bit with Arduino IDE ——Light LED, we have talked about how to install micro:bit library on Arduino IDE and how to drive LED on micro:bit with Arduino IDE. In this article, we are going to tell you how to drive micro:bit button and GPIO with Arduino IDE.
Button
Microbit has two self-carried buttons on the board. We call it button A and button B separately. The corresponding IDE PIN for button A is 5 and the corresponding IDE PIN for button B is 11. You can see the circuit diagram for button below.
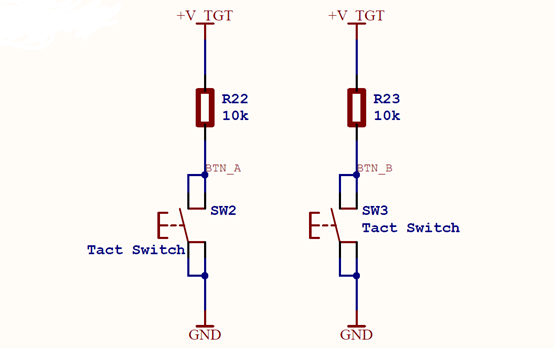
From this picture, we can see that the button has connected to pull-up resistance. Before the button is pressed, it is in high voltage. After the button is pressed, it is in low voltage. Here's the example code for the button:
[cceN_cpp theme="dawn"] const int buttonA = 5; // the number of the pushbutton pin const int buttonB = 11; // the number of the pushbutton pin void setup() { Serial.begin(9600); Serial.println("microbit is ready!"); pinMode(buttonA, INPUT); pinMode(buttonB, INPUT); } void loop(){ if (! digitalRead(buttonA)) { Serial.println("Button A pressed"); } if (! digitalRead(buttonB)) { Serial.println("Button B pressed"); } delay(10); } [/cceN_cpp]
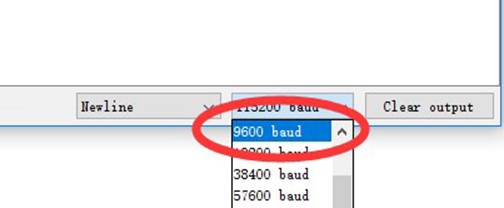
After you downloaded the program, set the baud rate of Serial Monitar to be 9600.
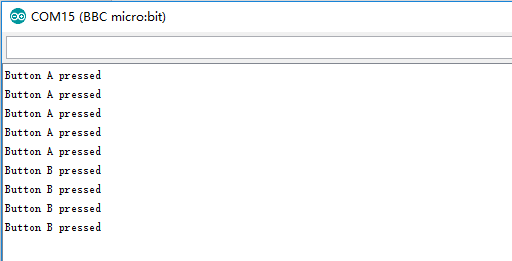
Press button A, Serial Monitar will display "Button A pressed"; press button B,it will display "Button B pressed".
Other GPIO
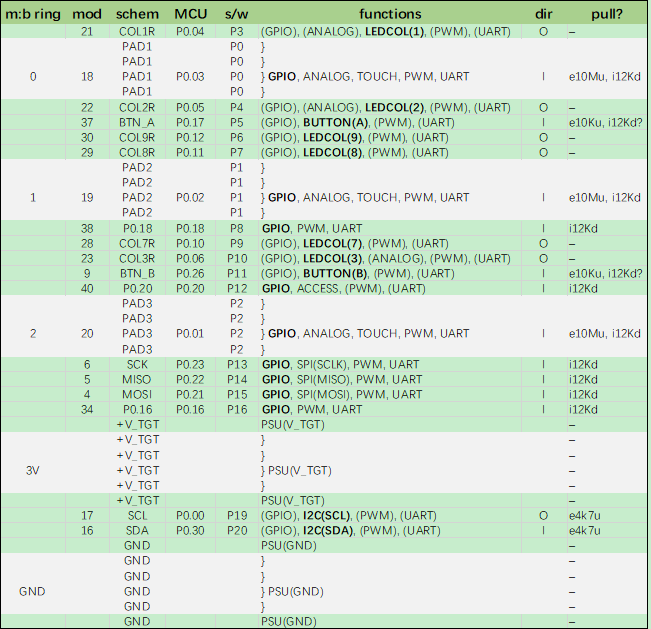
Micro:bit leads out partial IO port with its gold finger. We have to pay special attention to that most of IO port can be used repeatedly. To use these IO ports properly, you can refer to conditions of IO port repeat use. For more details, you can see the table below. This table shows various data about each of the pins on the micro:bit edge connector.
 You can use aligator clip to lead out P0, P1, P3,3V and GND conveniently. If it is still not enough for you, I would like to recommend you to buy a micro:bit breakout board.
Both the above two breakout boards can lead out all of IO ports, which enable you to program for these IO ports and control the outer circuit.
Relative Readings:
About the Author


How to Send Micro:bit Data to ThingSpeak IoT Platform
January 11, 2018

VC0706 Camera Module DIY Guide
December 18, 2014

nRF24L01 Module Demo for Arduino
May 6, 2011


Children’s Programming Education is the Future Trend
March 20, 2024
ELECFREAKS AI Smart Lens Now Compatible with Gigo Building Blocks!
February 21, 2024


Comments