


HC-SR04 Ultrasonic Module User Guide

Last week, we really released many user guides and video tutorials, including Bluetooth Bee, Bluetooth Modem, NFC shield/module, and we do not know whether they are beneficial for your operation or not. If you have any advice or idea for our tutorial or technical support, please feel free to contact us. This time, we launched the HC-SR04 Ultrasonic Module User Guide, and our technician also wrote HC-SR04 demo for the widespread DIY hobbyists to download. Take a look.
Part 1 Ultrasonic Introduction
The human ear can hear sound frequency around 20HZ ~ 20KHZ, and ultrasonic is the sound wave beyond the human ability of 20KHZ. The principle of ultrasonic distance measurement used the already-known air spreading velocity, measuring the time from launch to reflection when it encountered an obstacle, and then calculating the distance between the hc sr04 and the obstacle using hc sr04 ultrasonic distance sensor according to the time and the velocity. Thus, the principle of ultrasonic distance measurement is the same as radar. Distance Measurement formula is expressed as L = C X T In the formula, L is the measured distance, and C is the ultrasonic spreading velocity in air, also, T represents time (T is half the time value from transmitting to receiving ) from hc sr04 datasheet
Application:
- Ultrasonic measurement of distance, depth, and thickness;
- Ultrasonic testing;
- Ultrasound imaging;
- Ultrasonic machining, such as polishing, drilling;
- Ultrasonic cleaning;
- Ultrasonic welding;
Part 2 HC-SR04 Introduction
Module Operating Principle
Set low the Trig and Echo port when the hc sr04 initializes, firstly, transmit at least 10us high-level pulse to the Trig pin (module automatically sends eight 40K square waves), and then wait to capture the rising edge output by ultrasonic module hc sr04, at the same time, open the timer to start timing. Next, once again capture the falling edge output by ultrasonic module hc sr04, and at the same time, read the time of the counter, which is the ultrasonic running time in the air. According to the formula in hc sr04 datasheet: test distance = (high-level time * ultrasonic spreading velocity in the air) / 2, you can calculate the distance to the obstacle from the reading of hc sr04 ultrasonic distance sensor.
Feature:
- Stable performance
- Accurate distance measurement
- High-density
- Small blind
Application Area:
- Robotics barrier
- Object distance measurement
- Level detection
- Public security
- Parking Detection
Part 3 Use Freaduino UNO to test HC-SR04
Connection Description: D2<------>Trig D3<------>Echo (The users can define the connection pin by themselves)
Note: You need to set the Freaduino UNO switch on 5V Side when used together with HC-SR04 Module.
1. HCSR04 library function description Long timing()
Function name: timing Parameters: None Return Value: the time of ultrasonic from the transmitter to the receiver
float CalcDistance(long microsec,int metric)
Function name: CalcDistance
- microsec: the time of ultrasonic from the transmitter to the receiver
- metric: Set the unit of the return value ( the value of 1 for cm, and the value of 0 for in )
Return Value: the measured distance using hc sr04 ultrasonic distance sensor.
2. Add the HC-SR04 Library
Step1: Download the Demo Code of HCSR04 Ultrasonic from the address https://elecfreaks.com/store/download/product/Sensor/HC-SR04/HCSR04Ultrasonic_demo.zip and then unpack it to get the file of HCSR04 Ultrasonic.
Step2: Add the file of HCSR04 Ultrasonic in the hc sr04 datasheet of Arduino-1.0.X / hc sr04 datasheet. Step3: If you can see the Example of HCSR04 Ultrasonic in Arduino IDE, the addition of the HC-SR04 datasheet has been successful.
3. Test the Module with the Examples of the HC-SR04 datasheet
-
Open Arduino IDE 1.0.X, and choose the corresponding board and serial port.
-
Click File/ examples/ HCSR04Ultrasonic until the code pop up.
-
Compiling sketch until Done uploading appears, which represents the uploading has been successful.
-
Open the serial monitor and set the corresponding BaudRate.
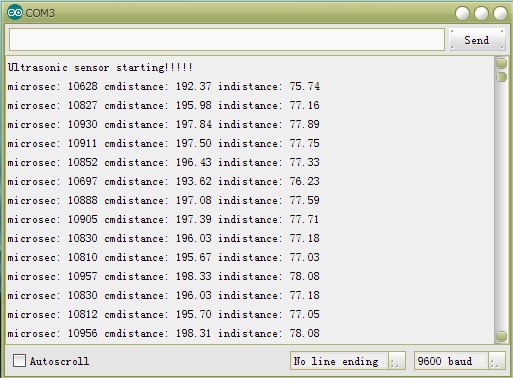
-
If you see similar information in the serial monitor as below, you succeeded.
About the Author


How to Send Micro:bit Data to ThingSpeak IoT Platform
January 11, 2018

VC0706 Camera Module DIY Guide
December 18, 2014

nRF24L01 Module Demo for Arduino
May 6, 2011


Children’s Programming Education is the Future Trend
March 20, 2024

ELECFREAKS AI Smart Lens Now Compatible with Gigo Building Blocks!
February 21, 2024


Comments