😊New Customer Discounts😊All Order Get 5% Off.
Menu


This article is from tinkercademy, you can see the link here: https://tinkercademy.com/tutorials/fish-feeder/
Tired of feeding your fish by hand? Here’s the micro:bit project for you! In this course, we will use an ADKeypad to control the motion of a servo to feed fish.
Step 0: Pre-build Overview
In this project, we are going to create a fish feeding machine. The movement of the servo will be controlled by the two red buttons on the ADKeypad and the OLED will display a message showing the status of the servo.
Materials:
1 x BBC micro:bit
1 x Micro USB cable
1 x Breakout board
1 x ADKeypad
1 x OLED
1 x Servo Wires
Goals:
Step 1: Components
Insert the micro:bit into the Breakout Board and plug in the micro USB cable, then plug in the OLED as shown in the picture above. You should be able to plug it into any of the three rows
Connect the ADKeypad to Pin 0 and the servo to Pin 1. Make sure the colour of the wire matches the colour of the pins on the Breakout Board.
Step 2: Pre-coding
We will add a package of code to enable us to use our kit components. Click on Advanced in the Code Drawer to see more code section and look at the bottom of the Code Drawer for Add Package.
This will open up a dialog box.Input “Tinker” in the search box and then choose “tinkercademy-tinker-kit” to add this package. Note: If you get a warning telling you some packages will be removed because of incompatibility issues, either follow the prompts or create a new project in the Projects file menu.
Step 3: Coding
Click on Tinkercademy inside the Code Drawer to find our custom blocks for the various components in your kit.
You should always initialize the OLED at the beginning. 64 and 128 represent the height and width of the OLED respectively.
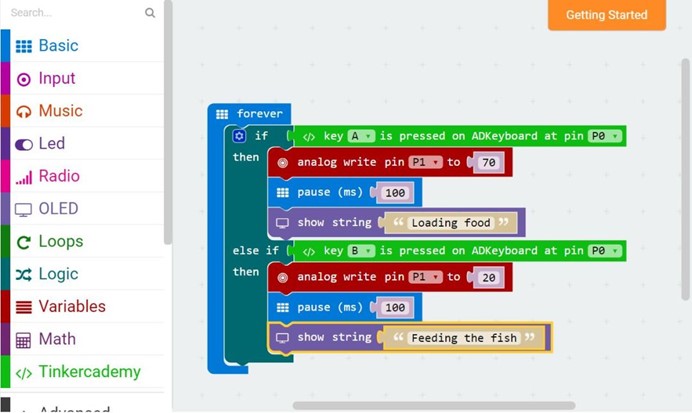
Since there are only two conditions, we need only one ‘else-if’ statement. If the button A of the ADKeypad is pressed, the servo will turn to angle 70 and the OLED will display “Loading food”. Or else, if button B of the ADKeypad is pressed, the servo will turn to angle 20 and the OLED will display “Feeding the fish”. You can adjust the servo angle to suit your requirement.
Step 4: Success!
Voilà! You have created a fish feeding machine!
Stay up-to-date with our latest promotions,discounts,sales,and special offers.