


Elecfreaks Motor:bit User Guide
January 7, 2019
Create An Electric Spirit Level
January 7, 2019
In this chapter, we will introduce a very important concept in Processing–Array. In previous data storage, we all used variables like int, float. Suppose we have 100 data to save, it will be quite troublesome to use the old method. The array described below can be used to store more data in a more convenient way. It is just like a box with a row of serial number. You can access information you need according to the serial number. Let me show you the basic grammar of array first.
Declare and Build Array
When declaring an array, we must designate a storing data type. Although it can hold multiple data, the data type must be the same. For example, interger type array stores integer type data only; floating type array stores floating type data only. Below is the declaration format of array: Data type[]variable name; When you want to declare an integer array, you can write in this way. Behind the data type follows a square bracket. After declaration finished, it still can’t be used directly. Instead, you have to initialize the array beforehand. Here’s the initialization format: new data type[data length??? So, after declaration, you can write like this: data = new int[5]; When initializing, you need to define the length of array. You can not ignore this step, or it will go wrong. To define length for array is like buying paper box when moving house. You have to estimate how many items in order to decide how many boxes you may need. Except for initializing after declaration, you can also complete it directly in a sentence of code. int[] data = new int[5]; When these steps are done, you can start to place something into it. With square bracket “[]” and subscript, you are able to read or write components of array. Subscript is equivalent to the serial number of a box. It is usually begin with 0. So the subscript of the first component is 0. The second is 1. And so on. Then the subscript of the last component is “array length – 1”. It is a convention to make subscript begin with 0. Although it might be a bit opposite to our intuition, you will get familiar with it by abundant practice. Since we know subscript now, if we want to assign value to a component of the array, we can write like the following: data[0] = 10; To read its data and test whether it is stored properly, we can use println to do a test. println(data[0]); // output is 10 Introduction about the basic grammar of array comes to an end here. Let’s look at a completed example. Code Example (11-1):
[cceN_cpp theme=”dawn”] int []numbers; void setup() { numbers = new int[5]; numbers[0] = 10; numbers[1] = 20; numbers[2] = 30; numbers[3] = 40; numbers[4] = 50; println(numbers[0]); println(numbers[1]); println(numbers[2]); println(numbers[3]); println(numbers[4]); println(numbers.length); } [/cceN_cpp]
Output in the console:
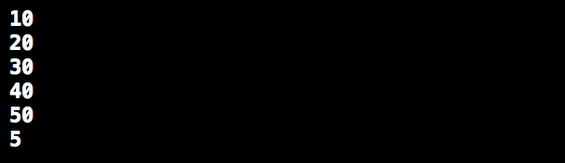
In this example, we have built an integer array with the length of 5, and done read and write to its components. “ numbers.length ” in the end can obtain the length of array. The format is “variable name. Length”. The subscript can not under 0 or beyond and equal to the length of the array. In this example, we cannot write numbers[???] or numbers[5], or the program will go wrong. Besides, there is another method to assign value. int []numbers = {10,20,30,40,50}; With this method, we don’t have to define array length. We only have to write each component into the bracket in order and separate it by commas. In the last, what is worhtwhile to pay attention is if we don’t assign value after declaration of array, the component values of int type are defaulted to be 0. When it is float type, the default value is 0.0. When it is string type, the default value is null, which means a blank number and nothing within.
Use For Loop To Assign Value In Processing
Sometimes we don’t want to manually assign values to components of every array. At this time, we have to use for loop. The example below has combined random function to assign random value to each component during initialization. Code Example (11-2):
[cceN_cpp theme=”dawn”] float []numbers; void setup() { numbers = new float[5]; for (int i = 0; i < numbers.length; i++) { numbers[i] = random(100); } for (int i = 0; i < numbers.length; i++) { println(numbers[i]); } } [/cceN_cpp]
Output in the console:
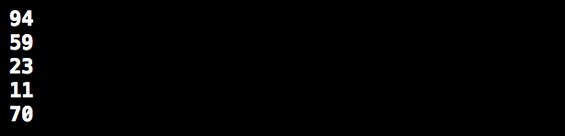
Code Explain: In the terminal condition of for loop, we have used numbers.length. This is a more conventional way of writing. Although it can be write into 5 directly, the benefit to do this is we can assure all data writen or output later, even when we have changed array length in the earlier, in stead of re-edit the value of terminal condition.
Use Array To Store Information Of People Or Goods
Suppose we want to store dufferent types of data such as people’ s information, price of goods, we can consider to use different types of array to store these data. Code Example (11-3):
[cceN_cpp theme=”dawn”] String[] name; boolean[] gender; float[] heights; int[] age; void setup() { name = new String[]{“Mike”, “Jake”, “Kate”}; gender = new boolean[]{true, true, false}; heights = new float[]{0.98, 1.34, 1.7}; age = new int[]{5, 10, 18}; for (int i = 0; i < 3; i++) { println(“name:” + name[i]+” gender:” + gender[i] + ” height:” + heights[i] + ” age:” + age[i]); } } [/cceN_cpp]
Result in the console:

“people”, as an entity, will have properties relative to name, height, gender and so on. But because of these properties are different types, we can’t place them into an array. Like name, which obviously belongs to character, will use String type. Gender, either male or female, we can consider to use boolean type. Age, which is usually an integer, use int. Because height is normally contains decimal, so we use float. As long as we record the various properties of the corresponding people in order, we can use a same subscript to extract the properties of the relative people and obtain our desired result. In this program, it will output name, gender, height and age separately in the same sentence.
Draw Random Round Points With Array
In the following, let’s start to set aside the abstract characters and try to use array in graphic world. In previous chapter, we have referred that we can use randomSeed to draw random round points on the graphic. With randomSeed, we don’t have to build variables. But obviously it has limits to do so. Here after studying array, we are able to use simple ways to note down the coordinate of every point. Code Example(11-4):
[cceN_cpp theme=”dawn”] float []pointsX, pointsY, radiuses; int num; void setup() { size(700, 700); num = 50; pointsX = new float[num]; pointsY = new float[num]; radiuses = new float[num]; for (int i = 0; i < num; i++) { pointsX[i] = random(width); pointsY[i] = random(height); radiuses[i] = random(20, 60); } } void draw() { background(0); noStroke(); for (int i = 0; i < num; i++) { ellipse(pointsX[i], pointsY[i], radiuses[i], radiuses[i]); } } [/cceN_cpp] Operate Result:

In contrast to the former examples, we can achieve exactly the same result with array. Here we have built two arrays: – pointsX and pointsY. Therefore we can save the horizontal and vertical coordinate of the round point separately.
Link Random Points With Lines
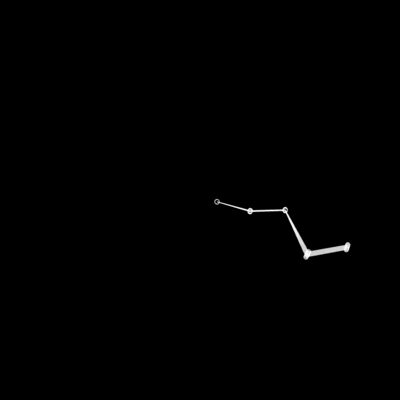
Some of you might be confused that since randomSeed can realize the same effect, why we have to store coordinate point independently. The example below, we use array to invoke the data of two points and link them with a line. If we use the method of randomSeed, we can’t know what value has generated in the last random. Because it is abandoned after using in every drawing instead of holding these data together into a container. Code Example(11-5):
[cceN_cpp theme=”dawn”] float []pointsX, pointsY, radiuses; int num; void setup() { size(700, 700); num = 50; pointsX = new float[num]; pointsY = new float[num]; radiuses = new float[num]; for (int i = 0; i < num; i++) { pointsX[i] = random(width); pointsY[i] = random(height); radiuses[i] = random(4, 14); } } void draw() { background(0); noStroke(); for (int i = 0; i < num; i++) { ellipse(pointsX[i], pointsY[i], radiuses[i], radiuses[i]); if (i > 0) { stroke(255); line(pointsX[i], pointsY[i], pointsX[i – 1], pointsY[i – 1]); } } } [/cceN_cpp] Operate Result:
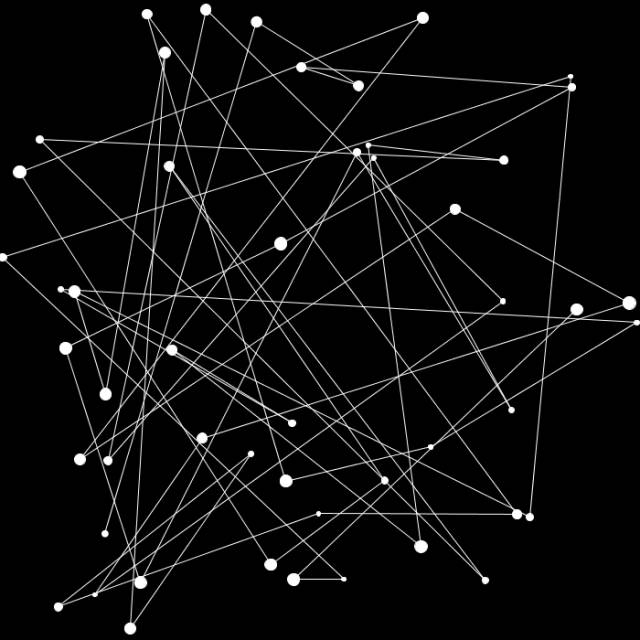
Code Expain: To draw a line, we can use function line. The two groups of coordinates in the front and back separately represent the two end points of the line. Suppose we want to connect two coordinates in the front and back of an array, the subscript of the first coordinate is i, then appearantly the former coordinate is i – 1. To write the judgement condition to be i > 0 with if statement is to insure the subscript do not cross the boarder line and the program will not go wrong. Because when i = 0, the subscript of pointX[ i – 1 ] is – 1. So we need to add an extra judgement to skip the condition when i = 0.
A Small Knack for you:
On the basis of the above example, we can create a local variable showNum to influence the terminal condition of for loop and finally generate a dynamic effect of linking line. Function setup can stay unchanged, while we replace function draw into the code below.
[cceN_cpp theme=”dawn”] void draw() { background(0); noStroke(); int showNum = int(millis()/1000.0 * 5); if (showNum > num) { showNum = num; } for (int i = 0; i < showNum; i++) { ellipse(pointsX[i], pointsY[i], radiuses[i], radiuses[i]); if (i > 0) { stroke(255); line(pointsX[i], pointsY[i], pointsX[i – 1], pointsY[i – 1]); } } } [/cceN_cpp]
Operate Effect:

Code Explain: Why the program can generate animation, it has relations with the value of showNum. When building showNum, it is a variable increasing with the operate time of the program. Every second passed here, its value will increase by 5. The terminal condition of for loop in the beginning is wrote “i < num”. This will draw out all of the points in the array. However, if it is a changeable value, we can display data one by one starting from the component with subscript 0. Later, if we want to make a palette to broadcast drawing traces, we can realize it with the similar way.
Draw Polyline With beginShape,endShape
In the former example, we have combined if condition statement to draw lines one by one. Next I am going to show you a method to simplify your writing method. Let’s take a look at a basic example. Code Example(11-6):
[cceN_cpp theme=”dawn”] void setup() { size(700, 700); } void draw() { background(0); beginShape(); vertex(350,100); vertex(100,600); vertex(600,600); endShape(); } [/cceN_cpp]
Operate Result:

Code Explain: When drawing graphic, we will use beginShape and endShape to wrap . We place beginShape in the head and endShape in the tail. Among it, function vertex is placed between them. It represents the peak. The two parameters in it are the horizontal and vertical coordinate of the point. There are three vertex functions written in the program. It will link up the three peaks in order. Because function noFill is not written, so the drawing result will be a fill graphic instead of polyline. Only if we add – noFill(); stroke(255); , it will display outline only and become polyline.

Once we grasped this writing method, we can write function draw in example 11-5 into:
[cceN_cpp theme=”dawn”] void draw() { background(0); noStroke(); beginShape(); for (int i = 0; i < num; i++) { ellipse(pointsX[i], pointsY[i], radiuses[i], radiuses[i]); vertex(pointsX[i], pointsY[i]); } endShape(); } [/cceN_cpp]
The operate result is the same.

Use Array To Draw Colorful Square
In the followin, we will introduce the usage of color type array. Let’s see an example first. Code Example(11-7):
[cceN_cpp theme=”dawn”] float[] rectsW, rectsH; color[] colors; int num; void setup() { size(700, 700); num = 150; rectsW = new float[num]; rectsH = new float[num]; colors = new color[num]; for (int i = 0; i < num; i++) { rectsW[i] = random(200); rectsH[i] = random(600); colors[i] = color(random(255), random(255), random(255)); } } void draw() { background(0); rectMode(CENTER); blendMode(ADD); for (int i = 0; i < num; i++) { float alpha = mouseX/(float)width * 255; fill(colors[i], alpha); float x = width/(float)num * i; rect(x, height/2, rectsW[i], rectsH[i]); }
} [/cceN_cpp]
Operate Effect:

Code Explain: There is no difference between color declaration and other types. But we have to pay attention to its unit when assigning value. And we can not omit color(). It must be data of color type so that it can be stored into array. When writing program, we need to think about which data should be stored by array. If there has fixed regulations, we can neglect it. In this example, the vertical coordinate of the rectangle is fixed, while the horizontal coordinate can be calculated by i. Thus we do not need extra array to store. Using add color mode, we can make the graphic after being overlapped generate glow effect. Here we have create local variable alpha so that we can change the transparency of color by moving mouse. If we delete add color mode, then we can see the original color effect of the rectangle.

Array Application In Circular Motion(1)
We have talked about how to use trigonometric function to create circular motion in the before. In order to make a signle object to do circular motion, we have to build three respective variables to store angle, horizontal coordinate and vertical coordinate. If we want to build more objects, we may consider array. So every property can be controlled independently. Code Example(11-8):
[cceN_cpp theme=”dawn”] float[] circlesX, circlesY, speed, angle; int num; void setup() { size(700, 700); num = 130; circlesX = new float[num]; circlesY = new float[num]; speed = new float[num]; angle = new float[num]; for (int i = 0; i < num; i++) { speed[i] = random(0.002, 0.03); } } void draw() { background(0); translate(width/2,height/2); for (int i = 0; i < num; i++) { float r = 30 + i * 2; angle[i] += speed[i]; circlesX[i] = r * cos(angle[i]); circlesY[i] = r * sin(angle[i]); ellipse(circlesX[i], circlesY[i], 8,8); if (i > 0) { stroke(255); line(circlesX[i], circlesY[i], circlesX[i – 1], circlesY[i – 1]); } } } [/cceN_cpp]
Operate Result:

Code Explain: Because we want to differentialize the speed of every circle, we have built speed variable to store speed information independently. Also , we can use the previous referred beginShape,endShape to draw polyline. The results are the same. However, as for the graphic drawn by beginShape,endShape, it will have a very extraordinary effect if we startup fill. Try to replace function draw in the above example with the method below.
[cceN_cpp theme=”dawn”] void draw() { background(0); translate(width/2, height/2); noStroke(); beginShape(); for (int i = 0; i < num; i++) { float r = 30 + i * 2; angle[i] += speed[i]; circlesX[i] = r * cos(angle[i]); circlesY[i] = r * sin(angle[i]); ellipse(circlesX[i], circlesY[i], 8, 8); vertex(circlesX[i], circlesY[i]); } endShape(); } [/cceN_cpp]
Operate Result:

In this way, we can change the polyline we drawn into polygon. Because the program will do automatic color inversion towards the overlapping part, thus the above effect is created.
Array Application In Circular Motion(2)
Based on the above code structure, revise some of the parameters. Try to write background in function draw into function setup. Code Example(11-9):
[cceN_cpp theme=”dawn”] float[] circlesX, circlesY, speed, angle; int num; void setup() { size(700, 700); num = 5; circlesX = new float[num]; circlesY = new float[num]; speed = new float[num]; angle = new float[num]; for (int i = 0; i < num; i++) { speed[i] = random(0.002, 0.03); } background(0); } void draw() { translate(width/2, height/2); noFill(); stroke(255,50); beginShape(); for (int i = 0; i < num; i++) { float r = 30 + i * 60; angle[i] += speed[i]; circlesX[i] = r * cos(angle[i]); circlesY[i] = r * sin(angle[i]); ellipse(circlesX[i], circlesY[i], 8, 8); vertex(circlesX[i], circlesY[i]); } endShape(); } [/cceN_cpp]
Movement trace of point:
Real operate effect:


It is inevitably monotonous with two colors of black and white only. Combined with the previously mentioned color mode, we can make graphic generate rich levels of color change effect. Try to replace the coloring part of the code. blendMode(ADD); colorMode(HSB); stroke(int(millis()/50.0) % 255,255,255,10); Operate Effect:


There are more senior usages about array waiting for you to explore it latter at will. This article comes from designer Wenzy.
Relative Readings:
Interesting Programming Guidance for Designer——Processing Initial Touch Interesting Programming Guidance for Designer–Create Your First Processing Program Interesting Programming Guidance for Designer–Get Your Picture Running(Part One) Interesting Programming Guidance for Designer–Get Your Picture Running(Part Two) Interesting Programing Guidance for Designer–Program Process Control- Loop Statement Interesting Programming Guidance for Designer–Program Process Control–Condition Statement (Part One) Interesting Programming Guidance for Designer–Program Process Control–Condition Statement (Part Two) Interesting Programming Guidance for Designer–Custom Functions and Fractal Recursion Interesting Programming Guidance for Designer–Custom Functions and Fractal Recursion Interesting Processing Programming Guidance for Designer–Color Control Interesting Processing Program Guidance for Designer-Media Loading and Event