

Micro:bit Experiment 08:Servo —???Elecfreaks Mirco: bit Starter Kit Course
January 8, 2019
Micro:bit Experiment 07:Temperature Sensor —???Elecfreaks Mirco: bit Starter Kit Course
January 8, 2019
Introduction:
Flexible 64 RGB 8*8 Rainbow LED Matrix is colorful and easy to control. You can use the only I/O port on LED Matrix to control multiple LED lights. In this article, we are going to teach you how to turn on a light on a LED panel.
Components List:
Hardware:
1 X Freaduino UNO Rev2.2 MB_EFUNO
1 X Flexible 64 RGB 8*8 Rainbow LED Matrix
3 X Jumper Wire
Software:
Arduino IDE
Major Component Introduction
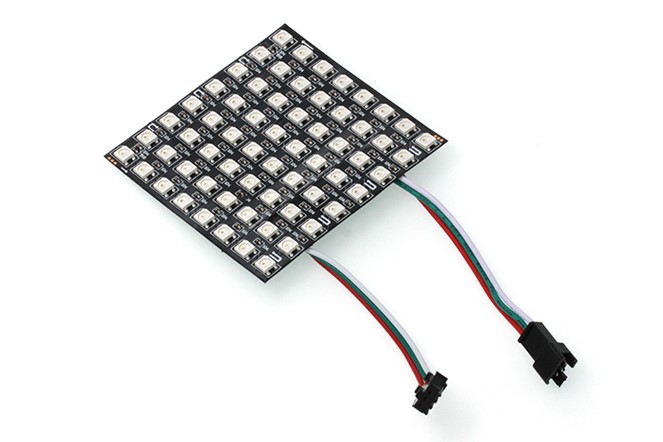
Flexible 64 RGB 8*8 Rainbow LED Matrix
Every bead on Flexible 64 RGB 8*8 Rainbow LED Matrix consists of three colors: red, green and blue. Through controlling the power of every bead with commands, we can create all kinds of colors.
Hardware Connection
Connect LED Matrix to port
D2 on Arduino board.

Programming
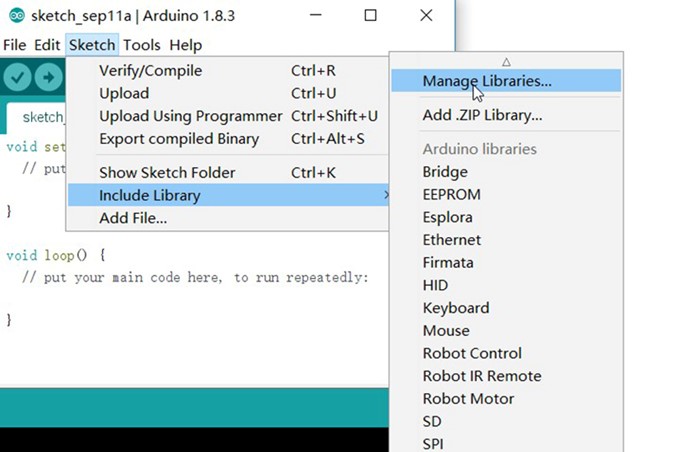
Step 1: Add Adafruit_NeoPixel Library
In order to use Adafruit_NeoPixel library, we have to put the head file of NeoPixel into the program and define LED corresponding pins.
[cceN_cpp theme="dawn"]
#include <Adafruit_NeoPixel.h>
#define PIN 2
[/cceN_cpp]
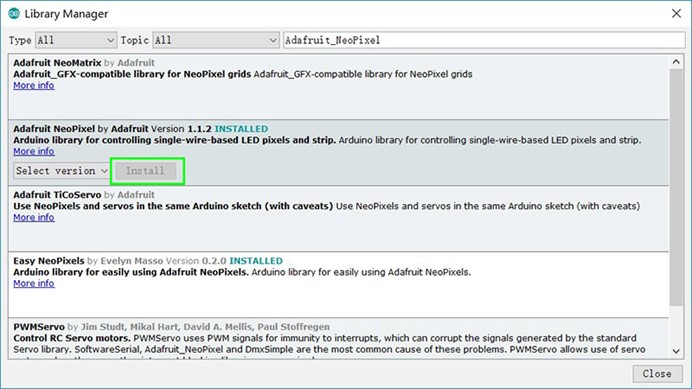
If there is no NeoPixel library in your IDE software, then you can add from “Sketch” on the top tool bar. Pull down the list of “Sketch”, find “Include Library”, then click “Manage Libraries” within “Include Library”. It will open an interface of library management. Search “Adafruit_NeoPixel” and click “Install”. You can complete this step according to the picture below.
Step 2: NeoPixel Setting
In our program, we have to address a NeoPixel object “strip” first, then we can use it to control LED strip on the panel. In the bracket, there is three parameters. These parameters are:
-
Quantity of LED beads on the panel. Each LED bead is a pixel.
-
The first pin number on micro-controller to connect LED
-
Full-color LED module number and parameter.
Code Example:
[cceN_cpp theme="dawn"]Adafruit_NeoPixel strip = Adafruit_NeoPixel(16, 2, NEO_GRB + NEO_KHZ800);[/cceN_cpp]
Step 3: Use “begin()” function to prepare for data output.
[cceNl_cpp theme="dawn"]
void setup() {
 strip.begin();
 strip.show(); // Initialize all pixels to 'off'
 }
[/cceNl_cpp]
In the second row, strip.show() is not a must. The function of it is to send data to LED and display it. So we set the initial status of NeoPixel to be “Off”.
Step 4: Color Setting
Set the color of each pixel with the method below:
[cceN_cpp theme="dawn"]
strip.setPixelColor(n, red, green, blue);
strip.setPixelColor(n, red, green, blue, white);
[/cceN_cpp]
Within the function of “setPixelColor”, the first parameter “n” is for LED serial number. The serial number of LED closest to micro-controller pin is 0. The following three parameters in sequence are used to describe pixel color. It separately represent the brightness level of red, green and blue. 0 is the minimum brightness and 255 is the maximum brightness. “White” in the last sequence is for optional parameter. It is only suitable for full-color LED with independent pure white light, i.e. RGBW LED.
Another pixel color setting method has 2 parameters only. You can see the format below:
[cceN_cpp theme="dawn"]strip.setPixelColor(n, LEDColor);[/cceN_cpp]
Within this function, “n” is for LED serial number. LEDColor is for 32-bit integer variable, which combines red, green and blue to a number. Sometimes, this can improve the effectiveness of the program. With the method below, we can converse the value of red, green and blue into 32-bit integer variable.
[cceN_cpp theme="dawn"]LEDColor = strip.Color(red, green, blue);[/cceN_cpp]
Step 5: Display
Function “setPixelColor()” will not influence LED display immediately. We have to send data to LED panel. At this time, we have to use function “show()”. Here is the format of this function: strip.show().
Below is the whole completed program. If you don’t want to program by yourself, you can download the whole program into Arduino Uno.
[cceN_cpp theme="dawn"]
#include <Adafruit_NeoPixel.h>
#define PIN 2 //Output pin
#define MAX_LED 1 //Quantity of LED

uint32_t LEDColor;
  // NEO_KHZ800 800 KHz bitstream (most NeoPixel products w/WS2812 LEDs)
  // NEO_KHZ400 400 KHz (classic 'v1' (not v2) FLORA pixels, WS2811 drivers)
  // NEO_GRB Pixels are wired for GRB bitstream (most NeoPixel products)
  // NEO_RGB Pixels are wired for RGB bitstream (v1 FLORA pixels, not v2)
  Adafruit_NeoPixel strip = Adafruit_NeoPixel( MAX_LED, PIN, NEO_RGB + NEO_KHZ800 );

void setup() {
  // put your setup code here, to run once:
  strip.begin();
  // Send data. Each point in the initial status is not illuminated because the color of each point is defaulted to be 0.
  strip.show();
}

void loop() {
  // put your main code here, to run repeatedly:
  LEDColor = strip.Color(0, 255, 155); //Set LED color to be purple. The three numbers stand for green, red, and blue respectively. Revise the three numbers, you can have different colors.
  strip.setPixelColor(0, LEDColor); //Set the first LED light to be purple. If you want more lights to be illuminated, you can use "for" circulation to set color of each light, then send these data.
  strip.show();//Send data.
}
[/cceN_cpp]
Experiment Result
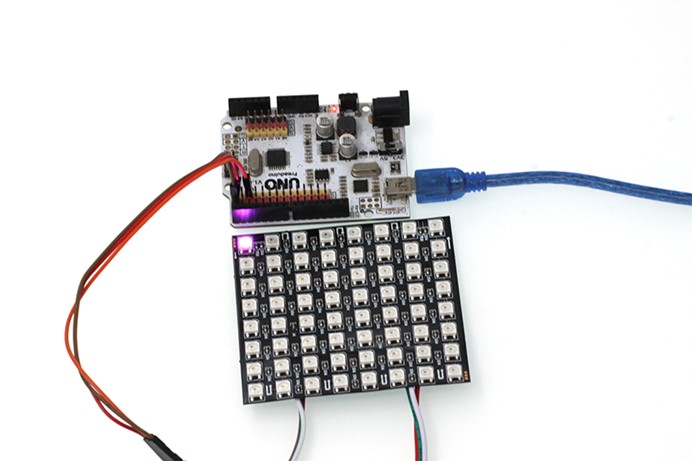
We can see an LED light illuminated on the panel of Flexible 64 RGB 8*8 Rainbow LED Matrix.