

1.Introduction
This is a simple car, I want the children to apply the knowledge of gear acceleration that they have learned in the course of the gyro launcher,and transform this simple car to make the car drive faster; or by replacing the tires. To increase the speed of the car, since there are no bigger tires in the kit, children can use big gears to replace tires with smaller diameters. At this time, they will have problems encountered in the swimming robot course. The gears will skid, so they also need to use the relevant knowledge of friction to overcome difficulties. In the end, I will let them race with their own trolley.
In this blog, I will share the structure and simple procedures of the simple trolley. This car uses two 24-tooth gears for transmission. It can be easily replaced with 40-tooth gears and 8-tooth gears, so that children do not need to adjust the overall structure of the car body when modifying the gear acceleration structure, which reduces the difficulty for children to learn.
2.Materials
micro:bit X 1
USB cable X 1
Motor X 1
3.Assembly
Build-up steps in PDF:
Hardware Connection:
Connect the motor to M1 on Nezha breakout board.

programming
Program to start or stop the ejector by pressing the crash sensor.
Click “Advanced” in the MakeCode to see more choices.

For programming, we need to add a package: click “Extensions” at the bottom of the MakeCode drawer and search with “nezha” in the dialogue box to download it.
Notice: If you met a tip indicating that some codebases would be deleted due to incompatibility, you may continue as the tips say or create a new project in the menu.
Code:
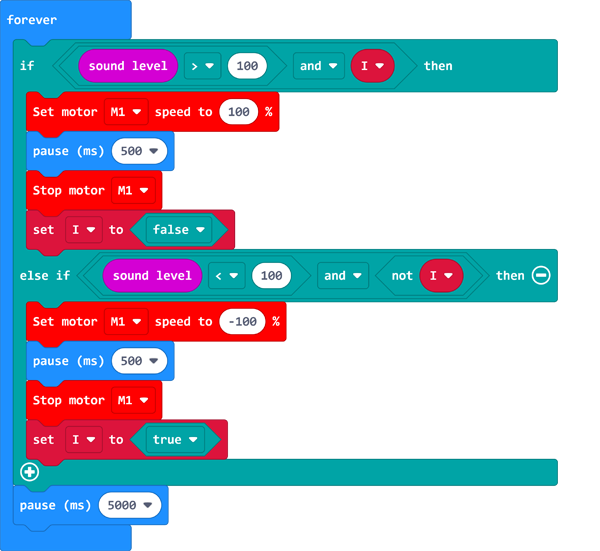
Link: https://makecode.microbit.org/_ijbJWkcUy9gF
Result
Press button A to start the car and button B to stop it.


