


BLEduino User Guide

BLEduino has been released for almost half a month, and we also received tremendous inquiries from distributors and retailers. As a Bluetooth module,it can be applied into a variety of terminal devices through the mobile APP control, so in order to give more guide to client's using method, besides the release of BLE APP for Android and IOS, we also launch the BLEduino User Guide , which is estimated to be helpful in BLE operations. The BLEduino board is first of its kind in integrating BT 4.0(BLE) module into Arduino Uno, making it an ideal prototyping platform for both software and hardware developers to go wireless. You will be able to develop your own smart bracelet, smart pedometer and more. Through the low- power Bluetooth 4.0 technology, real-time low energy communication can be made really easy.

Hardware:
- Android phones with system 4.3 and Bluetooth 4.0
- USB Cable
- BLE Adapter
- BLEduino Mainboard
Software
- Arduino IDE
- APP Arduino Controller
- Serial port debugging software sscom32E
Part 1 BLEduino USB Programming
Step 1 Hardware operation
Connect the BLEduino to the PC via USB cable
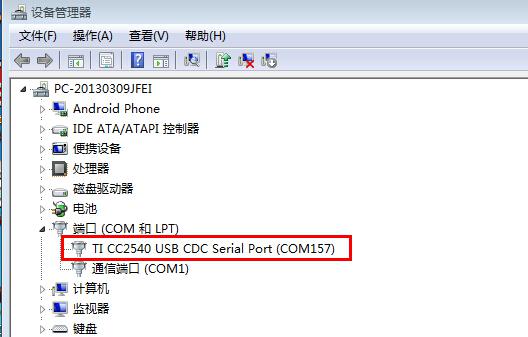
Step 2 Install the driver
When connected to the computer, the computer will prompt to install driver, follow the prompts to install
it( the way to install the driver is the same with Arduino UNO and the Driver Name is TI CC2540 Drivers).
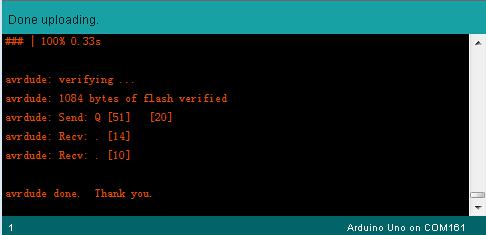
Step3 Programming
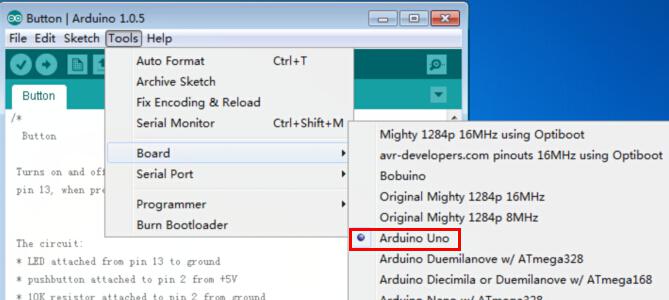
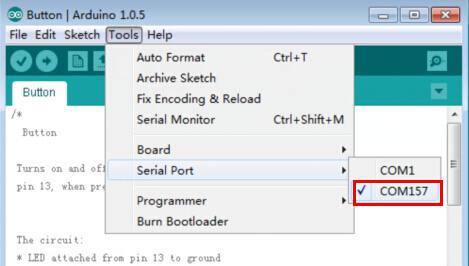
1. Open the program we need to upload with Arduino IDE, and then choose the Board of Arduino UNO, in addition, the corresponding Serial Port.
2.Compiling sketch until Done compiling appears
3.Uploading sketch until Done uploading appears(when uploading, TX, RX LED will be blinking)
Note: When USB programming, BLEduino had to disconnect with other Bluetooth, and the LINK LED will be twinkling when the Bluetooth is disconnected.
Part 2 BLEduino Wireless Programming
Step 1 Hardware preparation
Prepared BLEduino, BLE Adapter and USB Cable
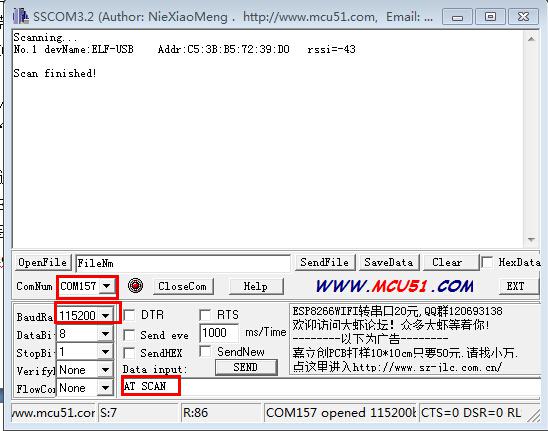
Step 2 Host searched slave and then connected to Slave
Connect the BLE Adapter Defaulted as host BLEduino Defaulted as Slaveto the computer.Via serial port debugging software,
open the serial port of host and Slave,and then host send AT SCAN+ Enter to search Slave,just as the following screenshot shows
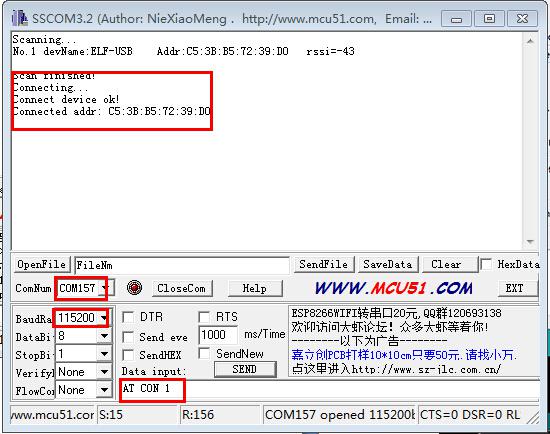
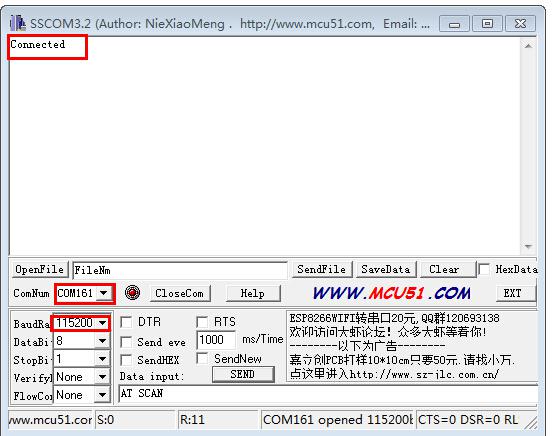
After the host searched the Slave, the host send AT CON 1 + Enter to connect the Slave, and the Slave can get the host Return Value
of connected if connection is successful,at the same time, BLEduino link LED will stop blinking and be always lit.
Step 3 BLE Adapter(host) Programming for BLEduino Slave
After the host connected to Slave,open the program need to be uploaded via Arduino IDE, choose the corresponding Board of UNO,choose the BLE Adapter (host) Serial Port, and then the specific operating steps are the same with USB programming, which has been introduced in detail previously.
Part 3 Mobile APP Control BLEduino MCU IO Mode
Step 1 Firmware Programming
Download Firmware AndroidIOControl and then open it Via Arduino IDE program the firmware to BLEduino MCU with USB, and the specific operation steps are the same with previous USB programming.
Step 2 Mobile phone connected to BLEduino(had to be set to Slave)
1. Open the Phone APP operating interface
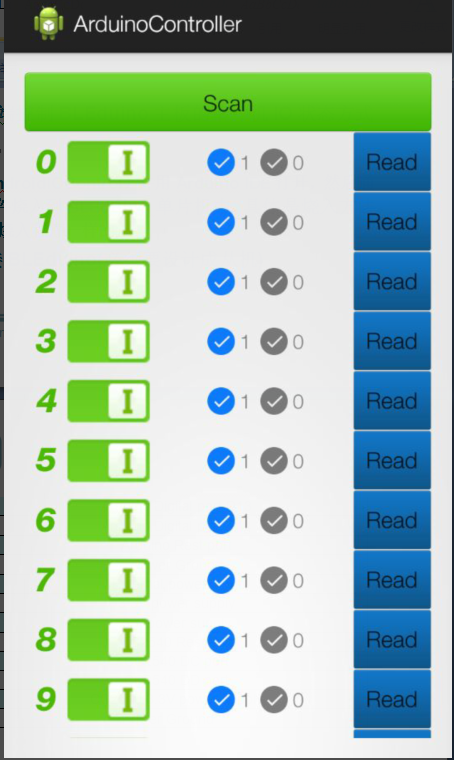
2. Click Scan to search Slave BLEduino as below
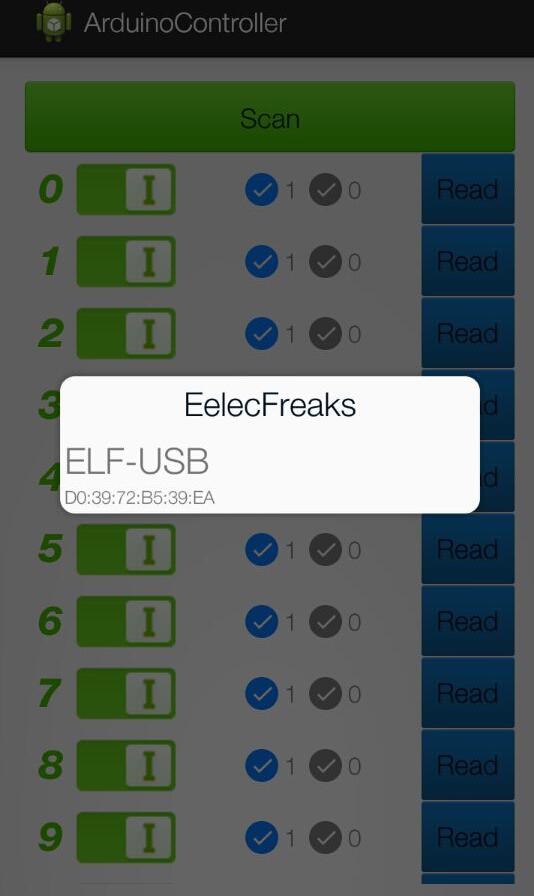
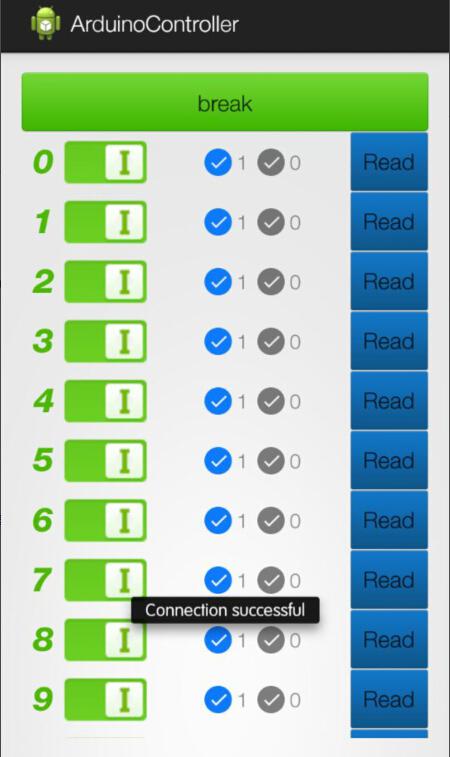
3. After searching the Slave ELF-USB,click ELF-USB to connect it, when it succeeded, Link LED will be always lit and phone App will prompt“connection successful”
Step 3 Mobile Control BLEduino MCU IO
Note: After the connection between BLEduino and mobile, if you want to perform the MCU read and write operations,
MCU has to be reset firstly(pressing the reset button is ok)
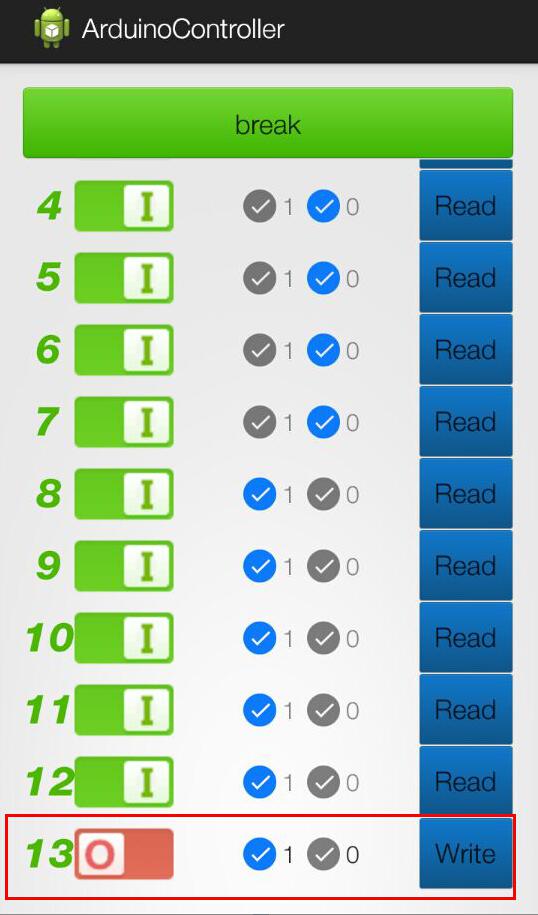
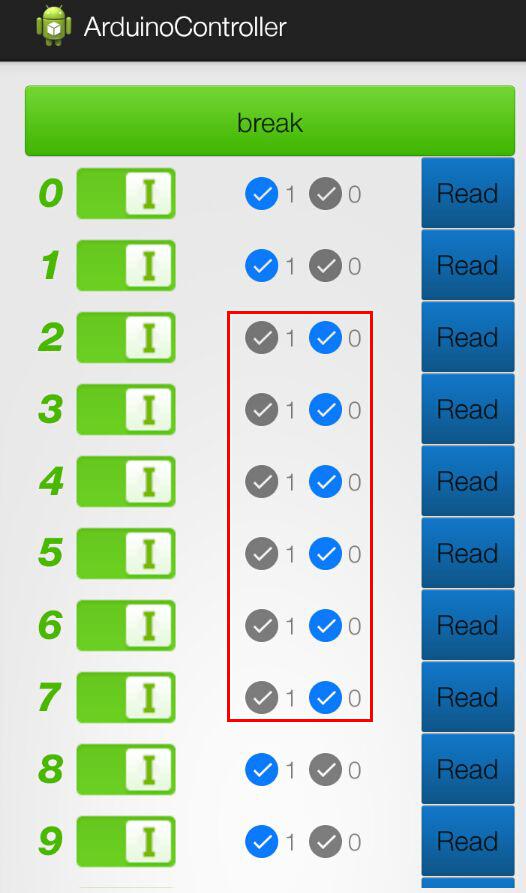
1. Firstly is Read Control to BLEduino MCU IO. On the left side of the App UI,
modify the IO switches which mean to control to I mode, then press the Read button on the right,
you can read the current MCU IO status, such as the following examples. (Operation IO: 2, 3, 4, 5 6 7)
2. When press the Read, the IO value is low (0). This is the complete simple Read operation.
3. Below is the Write control for BLEduino MCU IO. On the left side of the App UI,
modify the IO switches which mean to control to O mode, such as the following examples. (Operation IO: 13)
4. When press the Write button, Write out IO13 value as high
(1), and the D13 LED of the BLEduino mainboard would be lit, but if Write out IO13 value as low (0), the D13 LED would be off.

Part 4 AT Command description
1. AT CON // Connecting to slave, and the following parameters are the Slave Number from the searching list. AT CON ? can view help information.
2. AT BAUD // View, Set the baud rate following no parameter means viewing baud rate, following with parameter means setting baud rate( parameters are baud rates). AT BAUD ? can view help information.
3. AT NAME // View, Set the device name following no parameter means viewing device name, following with parameter means setting device name ( parameters are device names). AT NAME ? can view help information.
4. AT RENEW // Restore to factory settings no parameters AT RENEW Incapable use factory setting baud rate as 115200.
5. AT ROLE // View, Set the current role following no parameter means viewing current role ,following with parameter means setting current role( parameters are Role Code, 0 represents Slave, 1 represents host). AT ROLE ? can view help information.
6. AT MYMAC // Obtain MAC Address no parameters AT MYMAC Incapable use.
7. AT TRANSMODE // View, Set the transfer mode following no parameter means viewing current transfer mode,following with parameter means setting transfer mode,( parameters are transfer odes)AT TRANSMODE ? can view transfer code detail.
8. AT SCAN // Scan Settings following no parameters, AT SCAN Incapable use
9. AT DISCON // Disconnect the current connection following no parameters AT DISCON incapable use
About the Author


How to Send Micro:bit Data to ThingSpeak IoT Platform
January 11, 2018

VC0706 Camera Module DIY Guide
December 18, 2014

nRF24L01 Module Demo for Arduino
May 6, 2011


Children’s Programming Education is the Future Trend
March 20, 2024


ELECFREAKS AI Smart Lens Now Compatible with Gigo Building Blocks!
February 21, 2024


Comments