


The Pico:ed is a development board based on Raspberry Pi RP2040 MCU which has a passive buzzer onboard. We know that micro:bit is able to play music by MicroPython, thus, how to play music with Pico:ed?
First, we’ve to install the firmware for Pico:ed and we recommend using CircuitPython. Download through CircuitPython to get the latest firmware, keep pressing the BOOTSEL button on the back of Pico:ed and connect it to the computer with the USB cable, then release the BOOTSEL button. You should see a disk of RPI-RP2(see below picture). Drag the firmware you’ve downloaded to this disk to finish the installment, then the name of the disk changes to CIRCUITPY.

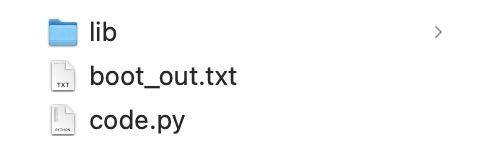
You should see the files and folder below after opening the disk, among which code.py is for coding and lib is the folder to save libraries. If you need more references on how to use Pico:ed, please review the documentation here with more details on getting started.
In order to simplify the way play music through Pico:ed as the micro:bit does, I wrote the library of elecfreaks_music, it also supports other hardware which uses CircuitPython, such as the micro:bit V2. If you’d like to use the library for other hardware, it might be required to add some dependent libraries manually, for more information please go to README.md. It is quite easy to use the library with Pico:ed as we have already complied with both the library and the dependent libraries in the firmware of Pico:ed. Only two lines of the code are able to play music, let’s have a try!
Open code.py in CIRCUITPY, program as below to play DADADADUM.
from picoed import music

music.play(music.DADADADUM)
Is it quite easy to play built-in music? Besides the above DADADADUM, the music module has also transplanted all the other built-in melodies which are for micro:bit.
Besides playing the built-in melodies, we can also play any music that we are interested in. Before programming, we have to understand how to describe a melody of Musical Notation with Python.
Musical Notation:
An individual note is specified thus:
NOTE[octave][:duration]
For example, A1:4 refers to the note “A” in octave 1 that lasts for four ticks (a tick is an arbitrary length of time defined by a tempo setting function – see below). If the note name R is used then it is treated as a rest (silence).
Accidentals (flats and sharps) are denoted by the b (flat – a lower case b) and # (sharp – a hash symbol). For example, Ab is A-flat and C# is C-sharp.
Note names are case-insensitive.
The octave and duration parameters are states that carry over to subsequent notes until re-specified. The default states are octave = 4 (containing middle C) and duration = 4 (a crotchet, given the default tempo settings – see below).
For example, if 4 ticks is a crotchet, the following list is a crotchet, quaver, quaver, crotchet-based arpeggio:
[‘c1:4’, ‘e:2’, ‘g’, ‘c2:4’]
The opening of Beethoven’s 5th Symphony would be encoded thus:
[‘r4:2’, ‘g’, ‘g’, ‘g’, ‘eb:8’, ‘r:2’, ‘f’, ‘f’, ‘f’, ‘d:8’]
The definition and scope of an octave conform to the table listed on this page about scientific pitch notation. For example, middle “C” is 'c4' and concert “A” (440) is 'a4'. Octaves start on the note “C”.
Now we are able to have the custom melody played with the above formats. The sample code is here:
from picoed import music

# play Prelude in C.
notes = [
    'c4:1', 'e', 'g', 'c5', 'e5', 'g4', 'c5', 'e5', 'c4', 'e', 'g', 'c5', 'e5', 'g4', 'c5', 'e5',
    'c4', 'd', 'a', 'd5', 'f5', 'a4', 'd5', 'f5', 'c4', 'd', 'a', 'd5', 'f5', 'a4', 'd5', 'f5',
    'b3', 'd4', 'g', 'd5', 'f5', 'g4', 'd5', 'f5', 'b3', 'd4', 'g', 'd5', 'f5', 'g4', 'd5', 'f5',
    'c4', 'e', 'g', 'c5', 'e5', 'g4', 'c5', 'e5', 'c4', 'e', 'g', 'c5', 'e5', 'g4', 'c5', 'e5',
    'c4', 'e', 'a', 'e5', 'a5', 'a4', 'e5', 'a5', 'c4', 'e', 'a', 'e5', 'a5', 'a4', 'e5', 'a5',
    'c4', 'd', 'f#', 'a', 'd5', 'f#4', 'a', 'd5', 'c4', 'd', 'f#', 'a', 'd5', 'f#4', 'a', 'd5',
    'b3', 'd4', 'g', 'd5', 'g5', 'g4', 'd5', 'g5', 'b3', 'd4', 'g', 'd5', 'g5', 'g4', 'd5', 'g5',
    'b3', 'c4', 'e', 'g', 'c5', 'e4', 'g', 'c5', 'b3', 'c4', 'e', 'g', 'c5', 'e4', 'g', 'c5',
    'a3', 'c4', 'e', 'g', 'c5', 'e4', 'g', 'c5', 'a3', 'c4', 'e', 'g', 'c5', 'e4', 'g', 'c5',
    'd3', 'a', 'd4', 'f#', 'c5', 'd4', 'f#', 'c5', 'd3', 'a', 'd4', 'f#', 'c5', 'd4', 'f#', 'c5',
    'g3', 'b', 'd4', 'g', 'b', 'd', 'g', 'b', 'g3', 'b3', 'd4', 'g', 'b', 'd', 'g', 'b'
]

music.play(notes)
With the programs above, wonderful music could be played, but how can you program to execute other functions while playing music? The function of asyncio from CircuitPython. Here, the sample is executing the blink function while playing music.
import board
import digitalio
import asyncio
from picoed import music

led = digitalio.DigitalInOut(board.LED)
led.direction = digitalio.Direction.OUTPUT

async def blink(interval):
    while True:
        led.value = True
        await asyncio.sleep(interval)
        led.value = False
        await asyncio.sleep(interval)

async def main():
    player = asyncio.create_task(music.play_async(music.PYTHON))
    light = asyncio.create_task(blink(0.15))
    await asyncio.gather(player)
    await asyncio.gather(light)

asyncio.run(main())
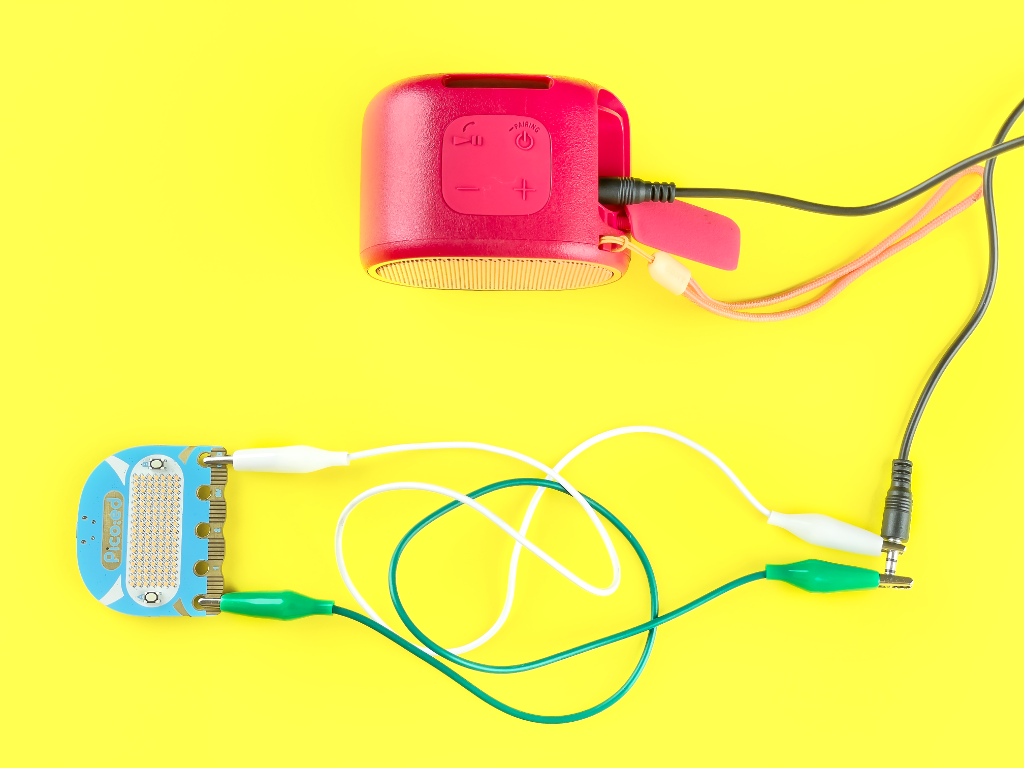
With the strong function of CircuitPython, we can play music in wav or even mp3 formats driving the speaker by PWM pins or external speakers. Theoretically speaking, the onboard buzzer is able to play music in wav format, but the sound level should be very low as there is no extra power to amplify the circuit. Here we are using an external speaker to show how to play wav format music.
First of all, prepare an external speaker and have it connected with a 3.5mm audio cable to the Pico:ed and also with the alligator clips. The connection diagram can be found below:
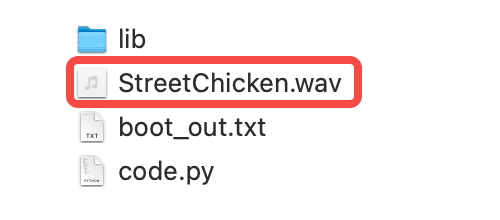
Download an audio file StreetChicken.wav for testing. Copy it to the disk of CIRCUITPY as the diagram suggests below:
Open the code.py file in the CIRCUITPY disk to start programming. Copy in with the below program to play the wav file, it is simple and amazing!
import board
import audiocore
import audiopwmio

data = open("StreetChicken.wav", "rb")
wav = audiocore.WaveFile(data)
audio = audiopwmio.PWMAudioOut(board.P0)

audio.play(wav)
It looks like a lack of interest and completeness if we only play wav file. It is our common sense to know a music player shall have the functions of playing, stopping, pausing, and resuming playing. How to achieve those functions with the Pico:ed? We will use the onboard buttons A and B to do it. Button A is able to achieve the functions of playing/stopping, button B is able to achieve the functions of pausing/resume playing. For the detailed program please check the below code:
import board
import audiocore
import audiopwmio
from picoed import *

data = open("StreetChicken.wav", "rb")
wav = audiocore.WaveFile(data)
audio = audiopwmio.PWMAudioOut(board.P0)

is_paused = False

while True:
    if button_a.was_pressed():
        if audio.playing:
            audio.stop()
        else:
            audio.play(wav, loop=True)
            is_paused = False

    if audio.playing and button_b.was_pressed():
        if is_paused:
            audio.resume()
            is_paused = False
        else:
            audio.pause()
            is_paused = True
Now we can control the playing of the music, but, it looks like there is a lack of feedback! For example, if the music isn’t played, we do not know if it is in the pausing or stopping status; while the music is being played, it can be more interesting if we can have some dynamic effects. Thus, the LED screen of Pico:ed could be put into use. While stopping playing music, a program displays a “square”; while playing, the program displays a dynamic virtual frequency spectrum; while pausing, the program makes the frequency spectrum still. Of course, there is no rule to display the frequency spectrum and we just use the random function of CircuitPython as the real one is quite complicated. The concrete program can be found below:
import board
import audiocore
import audiopwmio
from picoed import *
import random
import time

data = open("StreetChicken.wav", "rb")
wav = audiocore.WaveFile(data)
audio = audiopwmio.PWMAudioOut(board.P0)

is_paused = False

def show_virtual_spectrum(interval=0):
    display.clear()
    for x in range(display.width):
        for y in range(random.randint(0, display.height)):
            display.pixel(x, 6 - y, 12 - y)
    time.sleep(interval)

def show_stop():
    display.show(Image.SQUARE)

while True:
    if audio.playing:
        if not is_paused:
            show_virtual_spectrum()
    else:
        show_stop()

    if button_a.was_pressed():
        if audio.playing:
            audio.stop()
        else:
            audio.play(wav, loop=True)
            is_paused = False

    if audio.playing and button_b.was_pressed():
        if is_paused:
            audio.resume()
            is_paused = False
        else:
            audio.pause()
            is_paused = True
In a word, these are all for playing music with Pico:ed. It’s always welcome to give us more ideas and feedback from your side, and if you are interested in getting more details for Pico:ed, please review our documentation.


