

Aplomb Adapter SOIC-boards For FlowerPad
January 12, 2019
Samples: Aplomb-boards SOIC32 adapters for FlowerPads
January 12, 2019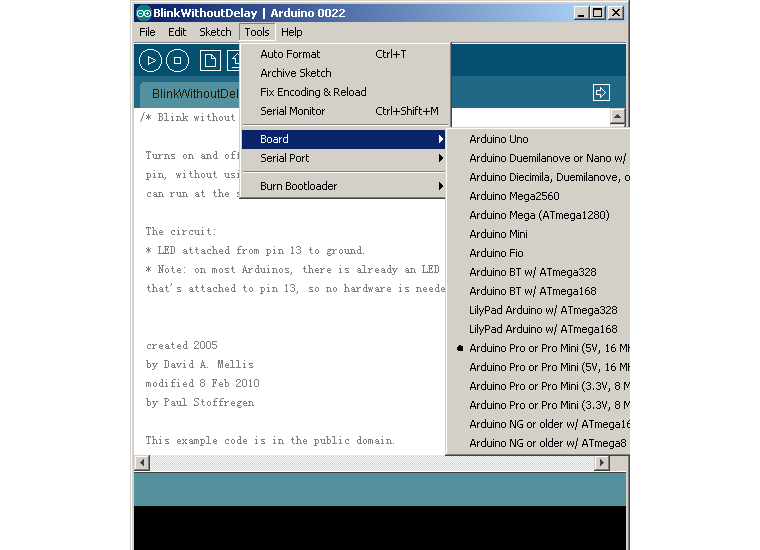
Some of guys purchased Arduino Pro Mini from us, however, many of peoples do not know how to upload Arduino Pro. Here I will teach you how to upload Arduino Pro with USB Bee Adapter. In simple terms you need to use Arduino Pro and USB Bee Adapter’s Serial Port for uploading. Let’s take a look:
Step One: Material preparation
- Arduino Pro Mini 328 Enhancement Version ,which 100% compatible with the original. We add two analog IO – A6, A7 , and Power Input side add auto recovery insurance, and be allowed USB and Power Supply at same time.
- USB Bee Adapter which is a compact USB to serial adapter equipped with BEE (20pin 2.0mm) sockets. With integrated FT232RL IC, It can be used for programming or communicating with board which basic Arduino but without USB interface,like Sniffer Nano. On the other hand, you may connect your PC to various wireless applications via the BEE compatible modules.
- 40 pin Premium Male/Female Jumper Wires , for connect Pro and Bee adapter.
Step Two: Connection
- Used M/F Jumper Wires connect USB Bee adapter . The Bee adapter’s pin define as : VCC , TX , RX , GND , DTR

- Connect USB Bee Adapter and Arduino Pro. Pin connect with: VCC – VCC , TX – RX , RX – TX , DTR – DTR

- Connect Bee Adapter to PC. When power on Arduino Pro , there are Power indicator and SMD LED Blink on D13 .
Notice : Don’t connect reverse VCC and GND, that maybe destroy Pro.

- After connecting PC, open Arduino IDE. Choosing your COMx as Tools->Serial Port->COMx . And then select Pro as : Tools->Board->Arduino Pro or Pro Mini(5V, 16MHz). At last, select a demo File->Example->Digital->BlinkWithoutdelay


- At least, Click ‘Upload’. if the TX LED is quick blink, that’s mean is uploading. When IDE said ‘Done upLoading’ , you are successful.
Reference :
- Schematic : http://elecfreaks.com/store/download/Arduino-Pro-Mini-v12.pdf
- Pro Mini Guide: http://www.arduino.cc/en/Guide/ArduinoProMini
- Pro Mini : http://www.arduino.cc/en/Main/ArduinoBoardProMini
- Arduino IDE : http://arduino.cc/en/Main/Software
If you have any suggestion, please feel free to let us know. Thanks!