

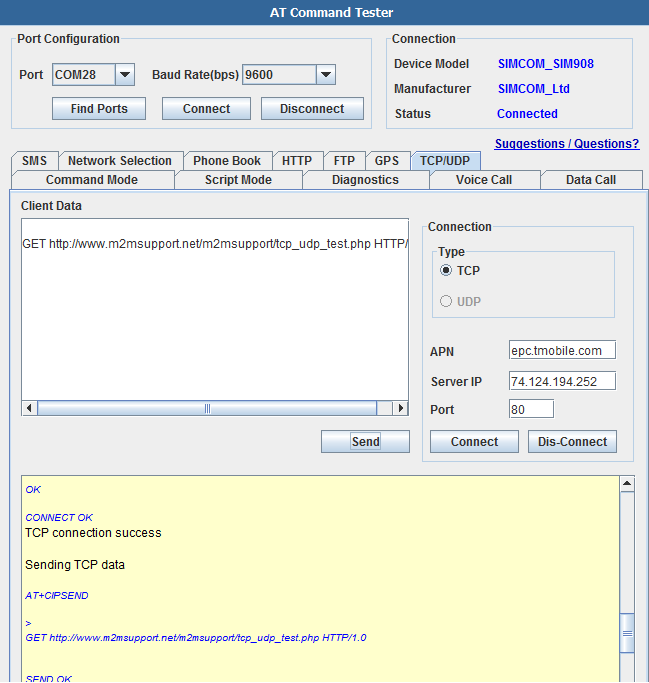
AT Command Tester
January 11, 2019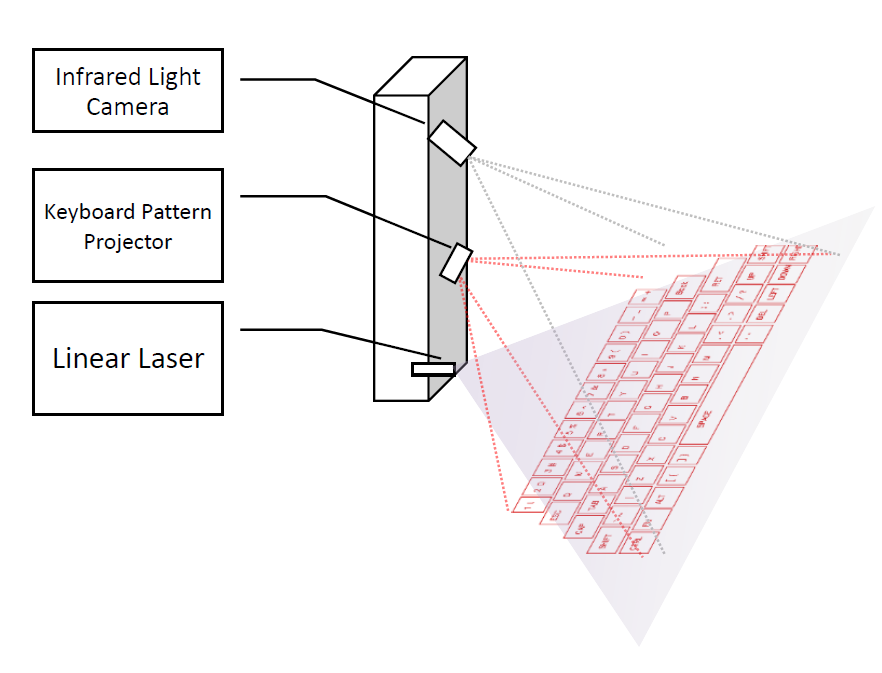
Open Source Laser Projection Keyboard
January 11, 2019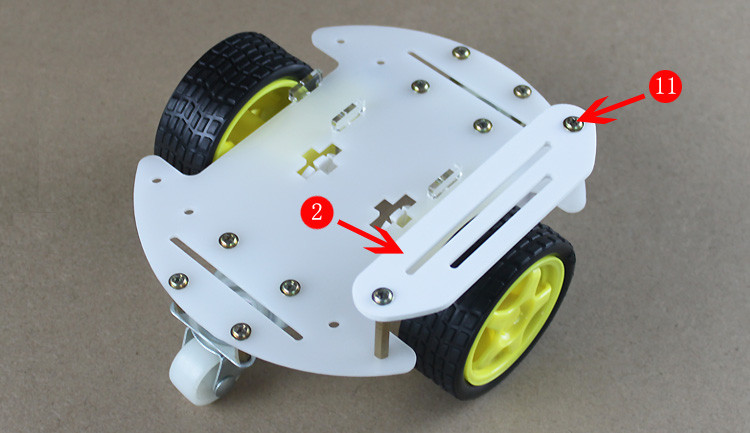
Previously we released one installation guide for 4WD serials smart cars, which invoked intense feedback among users and hobbyists who really like this serial of smart cars. Because we have put 2WD cars into shops, many friends reply to us that they have no clear ideas on how to install it owing to its diverse parts and different installation method with 4WD . Today, we will satisfy your curiosity for 2WD. Ready? Let’s go and see it.
Parts Introduction

Part 1: Smart car floor x 1.
Part 2 : Smart car sideboard x 2 (some 2WD cars do not have sideboards, which is up to different models.)
part 3 ???Smart car wheel x 2
part 4 ???nbsp;Geared Motor x 2.
Part 5: Caster x 2.
Part 6 : Acrylic fastener x 4
part 7 :Encoder disk x 2
part 8 :M3 * 30 Copper cylinder x 2
part 9 :M3 * 28 Screw x 2
part 10 :M3 * 13MM + 6 Copper cylinderx 8
part 11 :M3 * 7.5 Cap screw x 20
part 12: M3 Screw nut x 15
Step 1

Firstly assemble the encoder disk with the geared motor as illustrated above. Drop some glue if necessary (not too much because the motor can’t work if it is too sticky—–pay special attention )
Step 2

Place the acrylic fastener in the position as demonstrated above.
Step 3

Put the well-prepared motor installed just now into the corresponding position.
Step 4

Let the M3*28 screws go through the motor and the acrylic fastener, normally from outside to inside , and from upside to downside, but if you get the M3*30 screws, try to operate them from the other direction.
Step 5

Fix the motor in the other end with another fastener and two screw nuts .
Step 6

Connect the wheel with the fixed geared motor.
Step 7

Until now, we have completed one wheel, and there is no exception to other wheels in 2WD cars, therefore, let’s continue on how to install the caster which is not existing in 4WD.
Step 8

Assemble the caster with four screw nuts and four M3 * 13MM + 6 copper cylinders as above.
Step 9

Take out the previously installed caster and four M3 * 7.5 cap screw
Step 10

Install the parts mentioned in Step 9 as illustrated . So, you see, one caster has been finished, and as for the other one , we think it is not necessary for us to repeat the installation method.
Step 11

Now let’s start to install sideboard. Firstly take out M3 * 30 Copper cylinder and M3 * 7.5 Cap screws. The copper cylinder will be put upside the floor, and the cap screw downside it.
Step 12

Place the sideboard on the copper cylinder, then fasten them with cap screws as demonstrated . The finish of the sideboard means the completion of the whole 2WD smart car.