


Master Your Micro:bit with Arduino IDE --Accelerometer & Magnetometer

Magnetometer Lets start with the magnetometer chip, the MAG3110.
Click here to download: MAG3110 Datasheet We can talk to the chip using an Arduino library. You can download "Sparkfun's library" by clicking the button below! Download Sparkfun MAG3110 breakout library Restart the IDE. Now you can upload some examples. I suggest starting with the Basic example which is replicated below
[cceN_cpp theme="dawn"] /* ********************************************* * SparkFun_MAG3110_Basic * Triple Axis Magnetometer Breakout - MAG3110 * Hook Up Guide Example * * Utilizing Sparkfun's MAG3110 Library * A basic sketch that reads x y and z readings * from the MAG3110 sensor * * George B. on behalf of SparkFun Electronics * Created: Sep 22, 2016 * Updated: n/a * * Development Environment Specifics: * Arduino 1.6.7 * * Hardware Specifications: * SparkFun MAG3110 * Bi-directional Logic Level Converter * Arduino Micro * * This code is beerware; if you see me (or any other SparkFun employee) at the * local, and you've found our code helpful, please buy us a round! * Distributed as-is; no warranty is given. * *********************************************/ #include MAG3110 mag = MAG3110(); //Instantiate MAG3110 void setup() { Serial.begin(9600); mag.initialize(); //Initializes the mag sensor mag.start(); //Puts the sensor in active mode } void loop() { int x, y, z; //Only read data when it's ready if(mag.dataReady()) { //Read the data mag.readMag(&x, &y, &z); Serial.print("X: "); Serial.print(x); Serial.print(", Y: "); Serial.print(y); Serial.print(", Z: "); Serial.println(z); Serial.println("--------"); } } [/cceN_cpp]
Upload this to the Microbit to see the following raw data:
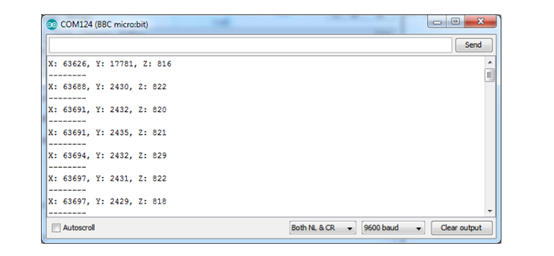
Note that the magnetometer is not calibrated, so you'll get different numbers on XYZ but when you twist and rotate the mirobit the numbers should move up and down a bit! (This is why magnetometers must be calibrated)
Accelerometer The microbit has an onboard 3-axis accelerometer as well! You can use this akafugu MMA8653 to communicate with it: Click here to download: MMA8653 Libraries Install like other libraries! Next up, run this example code:
[cceN_cpp theme="dawn"] /* * MMA845XQ test code * (C) 2012 Akafugu Corporation * * This program is free software; you can redistribute it and/or modify it under the * terms of the GNU General Public License as published by the Free Software * Foundation; either version 2 of the License, or (at your option) any later * version. * * This program is distributed in the hope that it will be useful, but WITHOUT ANY * WARRANTY; without even the implied warranty of MERCHANTABILITY or FITNESS FOR A * PARTICULAR PURPOSE. See the GNU General Public License for more details. * */ #include "Wire.h" #include "MMA8653.h" MMA8653 accel; void setup() { Serial.begin(9600); Serial.println("microbit accel test"); accel.begin(false, 2); // 8-bit mode, 2g range } void loop() { accel.update(); Serial.print(accel.getX()); Serial.print(" , "); Serial.print(accel.getY()); Serial.print(", "); Serial.println(accel.getZ()); delay(100); } [/cceN_cpp]
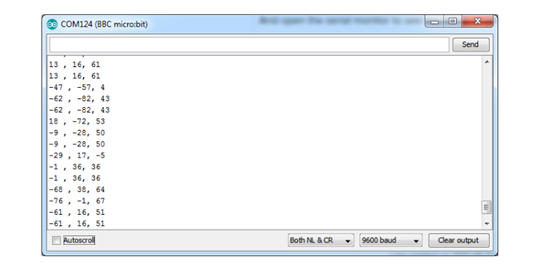
And open the serial monitor to see the X Y and Z acceleration data points!
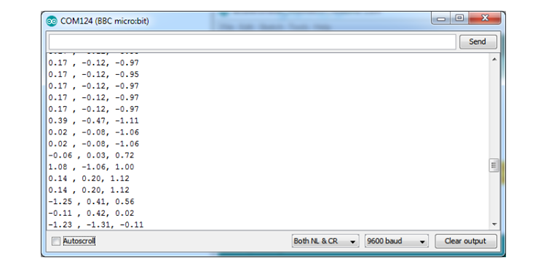
This library is pretty old and incomplete so at this time you can only use it in 8-bit mode. If you want to get the data in g's use this for the loop:
[cceN_cpp theme="dawn"] void loop() { accel.update(); Serial.print((float)accel.getX() * 0.0156); Serial.print(" , "); Serial.print((float)accel.getY() * 0.0156); Serial.print(", "); Serial.println((float)accel.getZ() * 0.0156); delay(100); } [/cceN_cpp]
Note: This post comes from https://www.adafruit.com .
Relative Readings:
Master Your Micro:bit with Arduino IDE ——Light LED
Master Your Micro:bit with Arduino IDE–Button and Other GPIO
About the Author


How to Send Micro:bit Data to ThingSpeak IoT Platform
January 11, 2018

VC0706 Camera Module DIY Guide
December 18, 2014

nRF24L01 Module Demo for Arduino
May 6, 2011


Children’s Programming Education is the Future Trend
March 20, 2024

ELECFREAKS AI Smart Lens Now Compatible with Gigo Building Blocks!
February 21, 2024


Comments