

OCTOPUS 1Channel Relay User Guide
January 11, 2019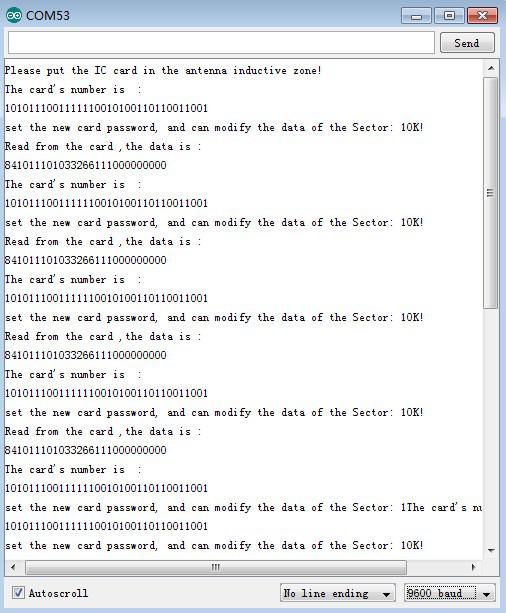
MFRC522 Module User Guide
January 11, 2019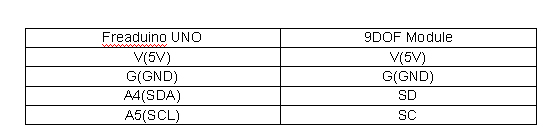
9DOF sensor module is a triple version for ITG3205 triaxial gyroscope + HMC5883L triaxial magnetic field + ADXL345 triaxial acceleration. Since this product was released on blog, we have received many orders from customers, and here we’ d like to give a big thank you to all of you. Thanks for your support, especially Mathias Wilhelm, he wrote a remarkable review for 9DOF Module , and currently we update another user guide for 9DOF Module with Processing .
9DOF module introduction
9DOF is a very small 9-axis sensor board, including the ADXL345 accelerometer, HMC5883L magnetic sensor, ITG3205 gyroscope. The module communicates with the main control board through IIC interface and can be fixed in your products through the 4 positioned holes on the module, in addition, our modules use a 3.3V LDO regulator circuit and BSS138 level conversion circuit, so you can use 5V power supply, two simple IIC interface to achieve sensor function test.

Processing introduction
Processing is a revolutionarily new computer language, and its concept is introducing programming language in the environment of electronic arts, at the meantime, introduce the concept of electronic art to the program designer. It is the extension of the Java language and supports many of the Java existing framework, but processing is much more simper in grammar (syntax)and has many user-friendly designs. Processing can use in Windows, MAC OS X, MAC OS 9, Linux and other operating systems. The works completed in Processing can be used in the personal computer, or publish in the web output in the Java Applets mode.
Hardware and software preparation

Hardware
1、Jumper wire × 4
2、USB cable
3、DOF module
4、Freaduino UNO
Software
1. arduino-0022
2. processing-1.5.1-windows
3. Arduino testing code
4. Processing testing code
Note :
1. Since Arduino test code was written in 022 version of IDE, 022 version is the best choice when users program it, and if users operate it in the higher version, programming mistakes would be likely to occur.
2. As Processing test code was written in 1.5.1 version, this version is the best choice when users operate it, and if users operate it in the higher version, many problems would be likely to occur.
Part 1 Freaduino UNO Operating Steps
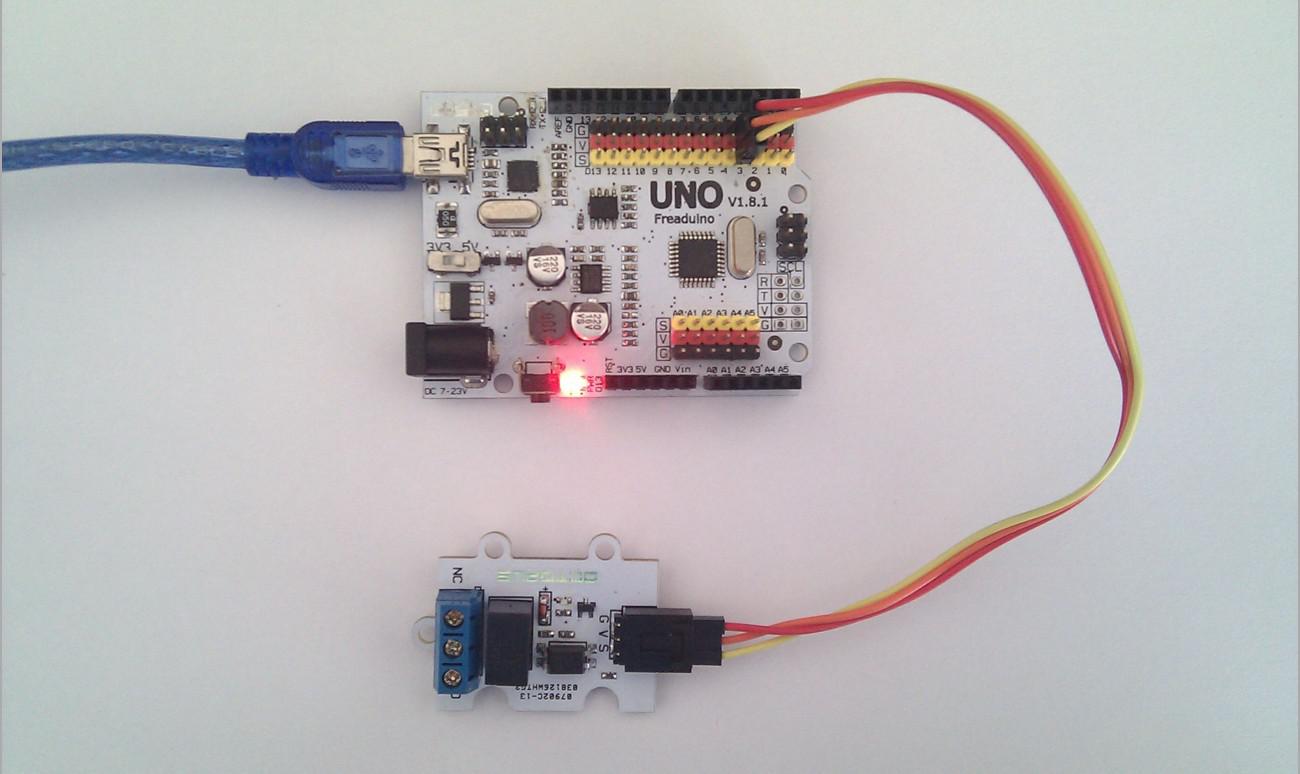
1. Hardware Connection

Connection description as below
2、Run the 9DOF test code
)Connect the 9DOF module and Freaduino UNO as the above picture
)Use arduino 022 to open the test program file.
)Compile the code and download it to Freaduino, and open the serial monitor to see the screen as follows

Code Part Description:
1. Code variables g_offx, g_offy, g_offz represent the gyroscope ITG3205 correction value, and the variables a_offx, a_offy, a_offz signify the acceleration sensor ADXL345 correction value. At the very beginning, the users need to correct these two sensors, and the correction steps as below: Remove the above variables used in the statement of getAccelerometerData and getGyroscopeData function.
2. Compile the modified code and download it to Freaduino UNO, then open the serial port monitor to printout information (9DOF module flat), the output information corresponding to the variables a_offx, a_offy, a_offz, g_offx, g_offy, g_offz.
3. Replace the variable values in the programme corresponding to a_offx, a_offy, a_offz, g_offx, g_offy, g_offz, with the information printout in the second step, then restore the statement with the function of getGyroscopeData and getGyroscopeData, finally compile and upload the program. Until now, the correction of the sensors was completed.
Part 2 Processing operating steps
1. Start the processing1.5.1 software
2. Open processing 9DOF test code 3. Run the test code, and the test effect indicated as below

Note When run the test code, processing terminal would display the following information

Displayed COMn indicates the PC serial port number . According to the information, users can see which serial port occupied by Freaduino UNO, and then modify the corresponding setup function myPort = new Serial (this, Serial . list () [1], 9600); The red 1 signified the UNO used in the PC is shown as COM16, but the users can modify it according to their actual situation. The above presentation in front of us is a static image, and the users can watch our video presentation if they want to see the real three-dimensional effect .
Q & A
1. Q: What to do when use higher version of arduino IDE to compile 9DOF test code, mistakes occur?
A: When Use high version of the IDE to compile the program, errors are mainly due to wire library, as in the high version, the write method replaces the send method, and the read method replaces the receive method, so if such errors occur, you just need to modify send into write, receive into read.
2. Q: When use processing1.5.1 to run the test code, the expected effect demonstrated like the video don’t appear, what to do?
A: If users can not obtain the expected presentation like the video, or print the error message in the processing Terminal, the possible reason may be as follow :
)The selected serial port in the test code is not the same with the actual use of the Freaduino UNO Serial Port.
)The Serial Monitor in Arduino IDE has been occupied(can not open the Serial Monitor)
)The data format sent by Freaduino UNO may be not correct so that the Processing Application can’t be resolved.