

FlowerPad and Aplomb Protoboard Family
January 11, 2019
Build Adjustable DC-DC Converter on Flower Protoboard
January 12, 2019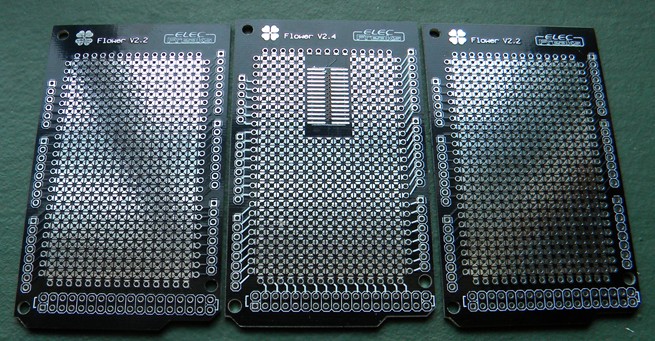
Hi Guys, thanks for your interest in ElecFreaks Flowerpad protoboard. Here is one of review from Foxx D’Gamma , which explains the protoboard in detail, worthy of sharing with you .
Let’ s jump right in and we secure that you will learn a lot from it.
” I started my adventures in electronics back in 1989, when I was just 8 years old with a great deal of help from my uncle, who was taking college courses in Electronics Engineering. Through the years I have come to enjoy the many aspects of all sorts of engineering in general. Being able to fool around with the variable concepts to change the outcome of a circuit has been a passion for many people and a profession. One thing I have come to learn is piecing the different components of a circuit design together. Taking your idea and doing a rough schematic, then into the prototyping phase, and eventually a final project that does something tricky, fanciful, fascinating, practical, or downright silly. Working with various prototyping techniques from breadboarding to home-etch PCB methods of all sorts, to prefabricated perforated boards, wire wrap, even a combination of making modular boards that plug into my breadboard designs to save time and space. Not much has changed over the years, until ElecFreaks came by with their brilliant Flower ProtoBoard Design.

The earliest methods of prototyping involved “wire spiders” or jumpers of wire all over the place, which soon evolved into wire wrap. Using prototyping board we can make solder trails as our main circuit paths. Of course back in “the old days” this was great, but by today’s standards where you have people making home made PCBs with an ink pen, etching in acid, and flowing the solder on their stove using an old junk frying pan. Crazy, but it works out very well. Here is a picture of a project I worked on not too long ago (2009) which is a typical wire-jump prototype. Nothing too special, as you can see I had to use a few through-hole jumps. This may look a mess to a novice but with all modesty this was something simple.

You think that is a mess? This is what a traditional wire-wrap board would pan out to look like. Have fun fixing an error on something like this, let alone find it, diagnose it, and reverse it.

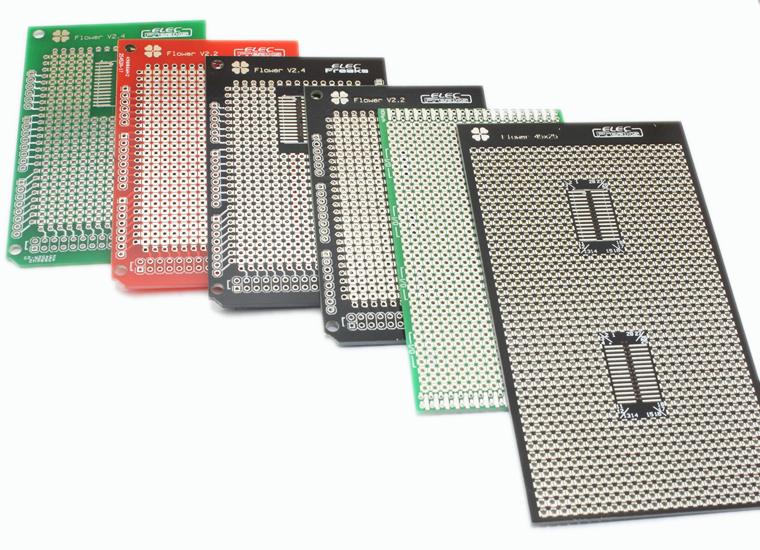
With the ever shrinking footprint of components one thing as a hardcore hobbyist I have heard the most complaints about is surface mount devices (SMD) and their ever shrinking packages. I recall a time SOIC was a major headache for many people. With some circuits, especially high frequency radio projects (like wifi and other microwave bands) you have no choice but to use SMD which means you have to crate a custom PCB that suits the layout and proper RF needs. ElecFreaks looked at the new-age footprint of smaller components, and the lack of progress made on prototyping board creating something that has evolved into a well needed bridge to fill the gap, their line of Flower Prototype Boards.

heir name “Flower Board” comes from their clover-like PCB pad design. Unlike strip-board or common through-hole prototyping board, they created a way to also use SMD components on top of the existing layout for traditional through-hole techniques. They also chose to have a dual layer design which is often overlooked by many prototype boards which only allows you to solder your components onto one side. I don’t know how many times I have had to waste space creating a wire bridge or needing to make a spiders web of wires jumping all over the board in order to make the connections for a circuit. There are a few different techniques you can use but having the ability to use SMD, Through-Hole, as well as dual layer all on one board, is a much needed improvement!

Being gifted by ElecFreaks with samples of their Flower Protoboards my head quickly filled with some interesting ideas, but first I needed to settle on which techniques to use. Before we begin on technique lets look at the build quality. Even though the pitch spacing itself is very small, only 0.1mm, the pads are robust enough to anchor your components to the board without fear of them being torn off. Using SMD the pad alignments are accurate enough for anything a sane person would want to use. One may think that using through-hole components there wouldn’t be enough pad surface to solder on to, but the Flower Protoboard “petals” are close enough where a quick solder bridge forms and your pad is in fact just as strong if not stronger than typical run of the mill protoboards. At first I was a little concerned about the potential heat hazard from the overuse of a hot iron lifting the pads off the board but it seems ElecFreaks knows the repeated errors of the novice and compensated by having a slightly thicker than usual PCB. Perhaps they did this intentionally to compensate for heat dispersal, or they wanted a thicker PCB for a more sturdy and robust final product design. In any case the slightly thicker PCB used offers better heat resistance so pads don’t burn or lift away, and it also adds to the sturdiness of the PCB itself. This also allows you to make stackable PCB designs, much like the Audrino Shields, with little worry of your board cracking or breaking while shifting around your various modules. Looking at the close pitch spacing between pads its easy to see right from the beginning doing a “solder run” technique is easier than ever. With normal through-hole protoboard you have the issue of “solder blobs” forming instead of a nice trail which acts as your circuit traces. This has not been my favorite technique mainly because of the horrible experiences with traditional protoboard, but not with the Flower Protoboard. It’s very simple to make nice clean straight traces without the need for flux. Of course you can also use thin wire to jump around the board as well, and use typical through-hole methods. It is also entirely possible to use wire wrap methods, which is great when working with various I/O and MCU projects, this way you can dynamically change the addressing paths of your I/O pins as needed as your project expands. Instead of having to entirely re-solder or reform a trace you can remove the wire and replace it. I don’t see many people using this technique in general, it would be nice to see a few more Flower Protoboards that allow a wire wrap technique using IC pads, which leads me into their SOIC carrier.

Small Outline Integrated Circuit (SOIC) chips have been the bane of many shaky hands and poor eyesight. It’s nearly impossible to use SOIC on traditional protoboards. Unless you use an SOIC to DIP package adapter, in the past there was no way to directly use a SOIC chip itself on your protoboard. The Flower-SOIC can carry any SOIC package from 8-Pin to 28-Pin which covers quite the array of MCUs (AVR and PIC of course) so you can roll your own Arduino or the like.

One thing that you notice early on with the Flower Boards is that they are not bare copper like many other brands. All of the pads are pre-tinned with solder, even through the via holes themselves which allow you to very easily solder to the boards, even without the use of flux. Even if you don’t have much use for SMD components these boards are very easy for anyone to use right from the start. They are not plagued with the typical nuances that come with a traditional prototype board. Usually it takes a bit of experience to get a good grasp of “proper” or “conventional” layout, mainly because of the limitations of earlier boards and their build quality. Often times I have burned pads, broken or chipped boards, had solder walk or crawl across to neighbor pads creating shorts or incorrect connections gone unnoticed. With the Flower Board you can be much more liberal with your layout and designs. These boards have me rethinking and reinventing new ways to get my gizmos out of my head and into my hands.
Overall Review The Good:
SMD has never been easier to handle, without the use of additional breakout boards. Works with almost any size SMD you would work with. Thick PCB design makes for sturdy and solid builds. Double side access giving twice as much available space for components. Similar PCB Shape and style as Arduino Shields. Excellent build quality. No “Solder Crawl” when working (usually).
The not so good:
Boards can be a little too thick, not fun trimming them down for smaller projects or carrier boards. Very hard to unsolder SMD components, especially when using solder-tracks to form circuits. Unlike many Arduino products you can’t piggy back another board on top evenly.
Summary:
These boards are great! If you like to handle an iron and get your spark on, these boards are for you! This is a huge evolutionary step forward for homebrew, hobby, and prototyping. This is something we needed a long time ago, and it’s finally here. I expect ElecFreaks to continue adapting their boards to suit our needs, and with how friendly they are towards suggestions, comments, and respectful critique, I can only expect the boards to improve more and more as time goes on. Components will continue to get smaller and smaller and I am sure we will all adapt new techniques to combat the scale issue, and with a concept and vision like what ElecFreaks has brought our way I don’t think we have too much worry about. Bring out the QTFP and BGA, roll out the solder balls and whip out that frying pan. We have solder smoke to make! Our ideas won’t build themselves but with some help they will solder-flow a lot easier now. ” That’s all . We believe Flower ProtoBoard there are more development potential and improvement waiting for your suggestion.
So we encourage guys who are experienced engineer or with extensive welding experience, and willing to write a test comment for us. Welcome to request for free product samples. Be one of them? It’s very simple.
Willing to write a test report or comment for flower ProtoBoard. You can post on yourself Blog or electronics enthusiast Form, please send the post link to us. Of course you also could feedback your report to us or within the post. Any suggestion to improve the Flower ProtoBoard Series is Welcome. Following quick steps:
Step 1: Register in the website.
Step 2: Order the Aplomb-boards or write an email to [email protected] please simple explain in the email to help us know more about you .
Step 3: review your request and shipping sample to you in the shortest possible time. Of course, you can directly write an email include your information. Enjoy !!