

GPRS Shield -EFCom in Store Now
January 11, 2019
Freaduino Family
January 11, 2019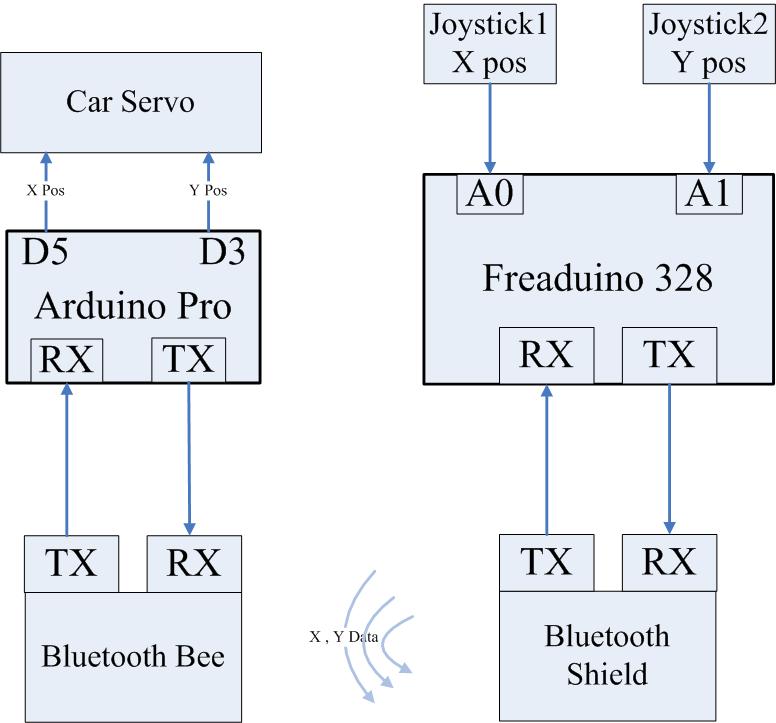
We just modified a two-driver car control by Arduino and Bluetooth module. The control side used Freaduino 328 and two Joystick module and Bluetooth Shield to send data. The other side used Arduino Pro and Bluetooth Bee to receive data and control the car. This modification just our step one. We will keep working for using Android phone to replace of Joystck and Bluetooth Shield side and adding acceleration due to gravity futher. Take a look at the demo video
be We will show you how to modiefied a two-driver car step by step, just follow me.
一:Preparation


- 1 x Freaduino 328???/strong>Read Joystick data and send it to Bluetooth Shield.
- 1 x Bluetooth Shield, Send X, Y pos to other side.
- 1 x Sensor Shield, For plugin Josytick module.
- 1 x Joystick Module, For get X, Y pos.
- 6 x 3p jumper wires, For connect Joystick module.
- 1 x The battery compartment, For external power supply
- 1 x Fixed base plate


- 1 x Arduino Pro, Deal the Bluetooth data to car servo
- 1 x Bluetooth Bee, Received the Bluetooth data from control side, powen on auto paired with Bluetooth Shield
- 1 x Bee adapter,For plugin Bluetooth Bee
- 1 x two-driver Car
??? Flow chart

??? Code
Freaduino Control Side code
[cce_cpp]
//

#include <NewSoftSerial.h>
#include <avr/pgmspace.h>

#define rxPin 2
#define txPin 3

NewSoftSerial mySerial(rxPin, txPin);

void setup()
{
  // define pin modes for tx, rx pins:
  pinMode(rxPin, INPUT);
  pinMode(txPin, OUTPUT);
  pinMode(A0, INPUT);
  pinMode(A1, INPUT);

  mySerial.begin(9600);
  Serial.begin(9600);
}

void loop(){
   // 0.175 is for Correcting the pox to 90, servor pos defoult 90. This data you can change by yourself
   int posX=(int)analogRead(A0)*0.175;
   int posY=(int)analogRead(A1)*0.175;

   mySerial.print("x");
   mySerial.print(posX);
   mySerial.print("y");
   mySerial.print(posY);
   mySerial.println("End");

   Serial.print("x=");
   Serial.println(posX);
   Serial.print("y=");
   Serial.println(posY);

   delay(300);
 }

[/cce_cpp]
Arduino Control Side code
[cce_cpp]
#include <NewSoftSerial.h>
#include <Servo.h>
#include <String.h>

#define rxPin 2
#define txPin 3
NewSoftSerial mySerial(rxPin, txPin);

Servo myservoX;  // create servo object to control a servo
Servo myservoY;                // a maximum of eight servo objects can be created

void setup()
{
  Serial.begin(9600);
  mySerial.begin(9600);
  myservoX.attach(5);  // attaches the servo on pin 9 to the servo object
  myservoY.attach(3);
}

void loop() {
  int i = 0, n=0, count=0;
  char someChar[32]={0};
  // when characters arrive over the serial port...
  if(Serial.available()) {
    do{
      someChar[i++] = Serial.read();
    }while (Serial.available() > 0);

    if(someChar[0] == 'x')
    {
      int flag = 1;
      while(flag)
      {
          if(Serial.available()) {
              do{
                    someChar[count++] = Serial.read();
              }while (Serial.available() > 0);

              if(strstr(someChar, "End"))
              {
                flag=0;
                while(someChar[n] != 'y') n++;
                char tmpbufx[4] = {0};
                strncpy(tmpbufx, someChar, n);
                int posX = atoi(tmpbufx);
                myservoX.write(posX);

                n=0;
                char* str = strchr(someChar,'y');
                char tmpbufy[4] = {0};
                while(str[n] != 'E') n++;
                strncpy(tmpbufy, str+1, n-1);
                int posY = atoi(tmpbufy);
                if(posY>105) posY = 105;
                else if(posY<85) posY = 85;
                myservoY.write(posY);
              }
          }
      }
    }
  }
}
[/cce_cpp]
??? Cautions :
- Please set Bluetooth Shield to Atuo paired mode. You need enter AT mode, and used AT+CMODE=1 . Please make sure you Master and chient Bluetooth Module has the same pair password.