


Micro:bit Experiment 13: Compass —???Elecfreaks Mirco: bit Starter Kit Course

Introduction
Do you know compass? I believe most of you have played it ever. Today I am going to use micro:bit to create a compass and display its direction on NeoPixels ring. Want to know how I do it? Just read the article below and follow my steps. Let's go!
Component List Hardware:
1 x Micro:bit Board
1 x Micro-B USB Cable
1 x Microbit Breadboard Adapter
1 x Transparent Breadboard - 83 * 55 mm
1 x 8 RGB Rainbow LED Ring
1 x Breadborad jumper wire 65pcs pack
Tips: If you want all components above, you may need Elecfreaks Micro:bit Starter Kit.
Software:
Microsoft Makecode Online Editor
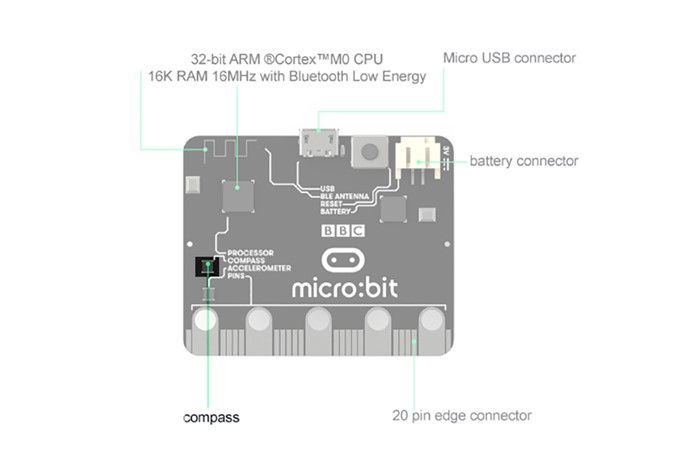
Major Component Introduction Compass
Here, compass in reality is a magnetometer. The magnetometer is a separate chip that provides magnetic field strength sensing. A software algorithm in the standard runtime uses the on board accelerometer to turn these readings into a board orientation independent compass reading. The compass must be calibrated before use, and the calibration process is automatically initiated by the runtime software. This device is connected to the application processor via the I2C bus.
Hardware Connection
Please complete hardware connection according to the picture below.
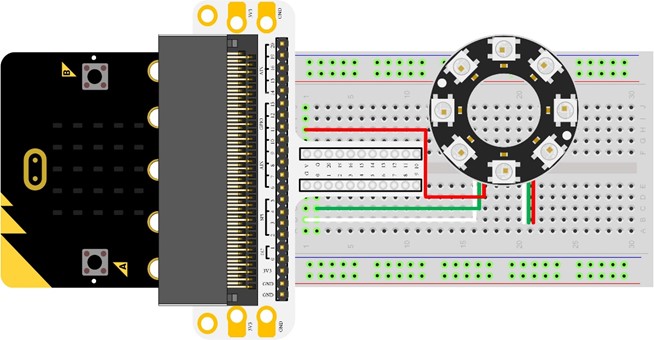
After connection, you will see:

We have to pay attention we must fix the 8 RGB Rainbow LED Ring according to the direction showed in the picture so that it can point right direction.
Programming Please open Microsoft Makecode, write your code in the edit area. I would like to suggest you program by yourself first. Of course, you can see the whole code in the link below. Just click Edit on the top right corner on the interface, and click Download to download code into micro:bit.
Code Explanation
Compass Heading Find which direction on a compass the micro:bit is facing. The micro:bit measures the compass heading from 0 to 360 degrees with its magnetometer chip. Different numbers mean north, east, south, and west. 0 degree mean the true north. 8 RGB Rainbow LED Ring has 8 LED beads, which can stand for 8 directions: North, North East, East, South East, South, South West, North West.
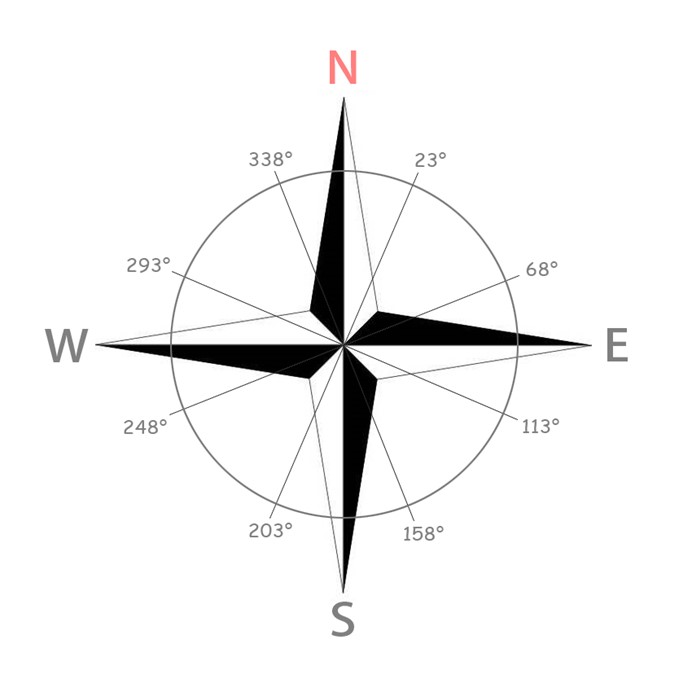 We divide this 360 degree coordinate system into 8 segments in average to help us judge the output value of Compass Heading. When the value comes to a segment, it means at that time micro:bit point at the direction of the segment shows.
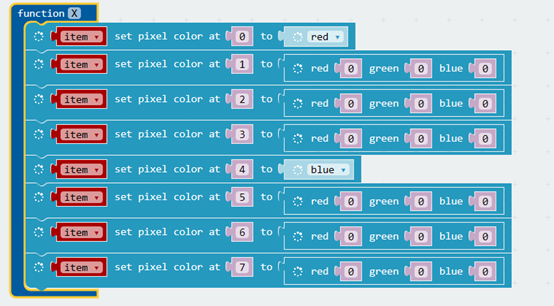
The function has set 2 pixel point in a diagonal into red and blue separately while other LED beads closed. We use red color to stand for true north, blue color to show true south and 0 color value of RGB for extinguish the LED bead light. Rotate micro:bit, the direction will change. However, we have to make 8 RGB Rainbow LED Ring always point at the same direction. So we must make LED bead light rotate in the opposite direction. Here, we use rotate pixels to define the offset value of the rainbow LED ring.
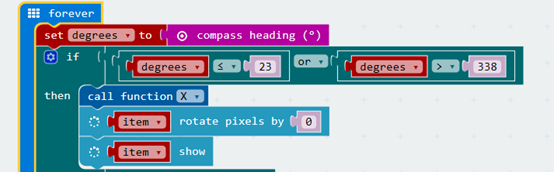
The key point of this program is to judge the output value of Compass Heading appears in which direction segment and offset the ring color value in the opposite direction. The whole code seems quite long enough, but actually most of it are very similar. It is very simple and easy. You can do it by yourself!
Experiment Result
Rotate the whole device, you can see the 8 RGB Rainbow LED Ring always point at the same direction. Note: Every time you start to use the compass (for example, if you have just turned the micro:bit on), the micro:bit will start to calibrate compass (adjust itself). It will ask you to draw a circle by tilting the micro:bit. If you are calibrating or using the compass near metal, it might confuse the micro:bit.

Question
If this experiment do not use 8 RGB Rainbow LED Ring but use the arrow displayed on micro:bit as indicator, then how to design circuit and program? We look forward to your comment and further discussion with us.
Relative Readings:
Start Your Micro:bit Programming Trip Micro:bit Experiment 01: LED Scroller —— Elecfreaks Micro:bit Starter Kit Course Micro:bit Experiment 02: Button —— Elecfreaks Mirco:bit Starter Kit Course Micro:bit Experiment 03: Trimpot —— Elecfreaks Mirco:bit Starter Kit Course Micro:bit Experiment 04: Photocell —— Elecfreaks Mirco:bit Starter Kit Course Micro:bit Experiment 05: RGB LED —— Elecfreaks Mirco:bit Starter Kit Course Micro:bit Experiment 06: Self-lock Switch —— Elecfreaks Mirco:bit Starter Kit Course Micro:bit Experiment 07:Temperature Sensor —— Elecfreaks Mirco: bit Starter Kit Course Micro:bit Experiment 08:Servo —— Elecfreaks Mirco: bit Starter Kit Course Micro:bit Experiment 09:Buzzer —— Elecfreaks Mirco: bit Starter Kit Course Micro:bit Experiment 10: Motor —— Elecfreaks Mirco: bit Starter Kit Course Micro:bit Experiment 11: Rainbow LED Ring —— Elecfreaks Mirco: bit Starter Kit Course Micro:bit Experiment 12: Accelerometer —— Elecfreaks Mirco: bit Starter Kit Course
About the Author


How to Send Micro:bit Data to ThingSpeak IoT Platform
January 11, 2018

VC0706 Camera Module DIY Guide
December 18, 2014

nRF24L01 Module Demo for Arduino
May 6, 2011


Children’s Programming Education is the Future Trend
March 20, 2024

ELECFREAKS AI Smart Lens Now Compatible with Gigo Building Blocks!
February 21, 2024


Comments